Woodworking design software – creating high quality images
Creating 3-D images with woodworking design software can be done in a number of ways. SketchList 3D actually allows you to design in three dimensions unlike some other CAD programs in cabinet design in which you design in two dimensions and toggle from time to time to check the design in three dimensions. Depending on your preference you can in fact design in two dimensions in SketchList 3D by selecting the view to be other than perspective in the image viewing area. You can mix the 2-D and 3-D design/imaging as well.
The advantage of working with the 3-D images in the design stage are that you can better see and understand the relationships – size and volume, location – of the various objects in your design.
For those of you using woodworking design software on the commercial side the obvious advantage is your client or prospective customer has the ability to visualize what he or she is buying. SketchList 3D users report time and time again how influential high quality 3-D imaging is in terms of positive impact on the sale.
3 three dimension views in SketchList 3D woodworking design software.
- In the design image area you click on the button in the upper left corner and select perspective as the view.
- For Professional SketchList 3D users there is the option to create a rotating 3-D model of your design and save that as a PDF file. The advantage of this approach is that you can send that file to anyone and they can using the Adobe file reader view that model and in fact spend it in different directions and view it from all angles. They can do this without having sketch list 3-D software installed on their computer. The Adobe file reader is pretty much on everyone’s computer – if not it can be downloaded for free from the Internet. One note of caution in order to view this file as 3-D you need to be using Adobe’s version of the reader.
- The final way to view your design in 3-D is to use the SketchList 3D photo realistic rendering function. You’ll see in the icon menu area the top left corner of the SketchList 3D main form an icon that looks like a camera. If you click that icon a photo rendering window will open. The image that will appear in this form is exactly that in the perspective view. So you should size and locate that view to show precisely what you want to show in the photo realistic image render.
We’ve added some control to the photo-realistic imaging function. Now you can control the amount reflectivity of an object by moving the reflection slide bar on the form. You can increase the reflectivity by material type.
- Solid lumber
- Sheet goods
- Other
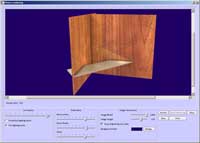
This screen capture of the photo rendering form shows the newly added reflection function. The design is just a series of boards put together. In fact the horizontal board actually cuts through one of the vertical sides. But you will notice on the vertical mahogany pieces the reflection from the horizontal piece of maple. You have experience with SketchList 3D and use the photo image function you might notice that in this sample there is a slightly different lighting effect on the pieces. In addition to adding of the reflectivity function in this newest build we’ve added and reposition additional lighting. This has two advantages. The first is that it simply allows for a more interesting image. The second is that it does a better job of defining the corners where to materials of the same type join.
I’d like to point out a few other things you can do to consistently produce high-quality 3-D photo like image.
- Set the quality slider bar far to the right.
- Check full lighting mode.
- Set the reflection to your preference. For example if you had a material in the other classification – say glass – you may set that to the maximum while setting sheet goods somewhere in the middle of the range.
- Selecting the background color can have a dramatic effect on the way the eye perceives the image. Experiment with that using different colors and different variations of light and dark. You can change the background color by clicking the change button to the right of the background color label.
Using the save button you can create any number of graphic files to save, use in proposals and reports, and or send to prospective clients.
Let me know what you think of the new features and please pass on any suggestions.
David Rozewski
My woodworking love started in 6th grade in school shop class. I have a BS in Industrial Technology and an MBA. At my first job, I computerized a production accounting system – the results were positive, and I loved the challenges. I left the corporate world to begin woodworking full time and one of my first decisions was to use CAD for my designs. I found that CAD did not meet all my needs. I wrote a specification of what I wanted and turned it into a prototype. SketchList 3D incorporated in 2007. We completed programming and launched. Today thousands of woodworkers use SketchList 3D.


