Cabinet Design Software – Consider the Project
Cabinet Design Software – Creating Projects Primer 1.
Projects are created in SketchList 3D. The definition of project includes the idea of planning and organization to achieve the desired outcome. Too many times when using SketchList 3D users rush the project creation stage and begin inserting boards and other objects.
Working with users I find mistakes that can be avoided by some upfront thinking are discovered at the end of the project design. For example, the project is ‘final’ and then the user realizes the crown molding must be added to the front and both sides of the design. So now the project size as originally specified is not large enough. SketchList 3D provides batch move for all boards and shrink and stretch capabilities that help address this problem. It is better at the project creation to consider what, where, and how objects will exist.
One user wrote in about SketchList 3D: “Once I realized I had to know what I was doing and think about it – things it became easier.”
This thinking process is a software version of: “measure twice, cut once”.
This post is going to lay out approach for beginning your cabinet design software project.
Projects contain assemblies. Assemblies obtain boards and/or doors, roars, hardware. Doors, drawers, hardware contain boards and or hardware. Hardware contains boards but really those boards can be any material such as metal.

When you begin designing your project you logically think the same way you would create that project shop or at the job site. So you start with boxes or carcasses, input sides and backs and tops, and keep going. At the end you remember that the front of the project needs a frame, or hardware, or molding. Because SketchList 3D ‘builds from the front to the back – there’s no room to add these things at the front.
SketchList 3D uses the corner where left equal bottom equal front equal to anchor every object in a design.
It is easy to increase the size of the project to the right, top, or back – away from the anchor. You can’t really increase the size of the project the left, front, or bottom – the anchor will stop.
This is because objects are located at a specific distance from the left, front, bottom. To “add space” to the left you must increase the project size to the right and move all of the objects to the right by the size required. For example, if I needed to resize the project towards the left by five units (which cannot be done directly). To do this you increase width of the project by five and add five to the left value of every object in the project. Of course this can be very tedious. SketchList 3D does have a batch move for this function. Better to plan ahead and get the spacing right the first time.
To avoid this when designing the project consider what happens at the edges or boundaries of the project.
- What happens on the front edge? There might be hardware, face frames, or perhaps a molding. Consider the detail of sides in the same fashion. Going to be some sort of overlap?
- Consider what happens on the side edges. Perhaps you will have something overhanging so you might scribe your project to fit an irregular wall.
This thinking will help you accurately size the project.
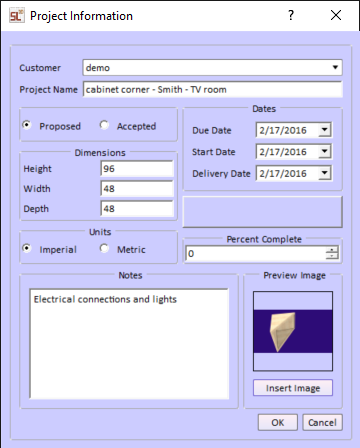
Size of the project is the biggest” box” that contains every element of the project including space – if necessary – for objects such as hardware.
If you are going to rotate an assembly within the project that project must be large enough to have the assembly spin inside the project without ash even for a moment – having the corner of that assembly go outside the boundary of the project. An assembly 1-foot-deep and 4 feet wide will not rotate the project 1 foot deep and 4 feet wide. The project would have to be something like 50 inches wide and 50 inches deep to rotate that assembly within it.
Again there is no real penalty of over sizing a project with the possible exception that you might place an object so it exists outside of the room so to speak

Naming the project involves some planning as well. I see customer’s databases projects named project one, two, project three and so on. Some sketch list 3-D users will title projects with names like Smith bathroom. Think about the types of work you do and how you might incorporate some bit order or coding into project names. For example, instead of Smith bathroom you might choose to title the project bathroom – Smith – master suite. It seems like a small point but as you create dozens and dozens of projects in SketchList 3D the project list is better organized.
In setting up the project another good practice is to insert some sort of image. Of course before you begin the design you have no image from SketchList 3D. If you have any kind of pencil drawing, photograph, or an image from a magazine, photograph or scan this image onto your computer and inserted in the record for that project. This way when the project form opens in SketchList 3D the project list will have images to help you select the project you want to open. You can change the image when you have a final design and even when you installed the work and take a photograph of the actual finished product. Always photograph your finished work.
In the project definition form is a place for notes. When creating the project, you should include any notes that will help you design or assist you in the shop.
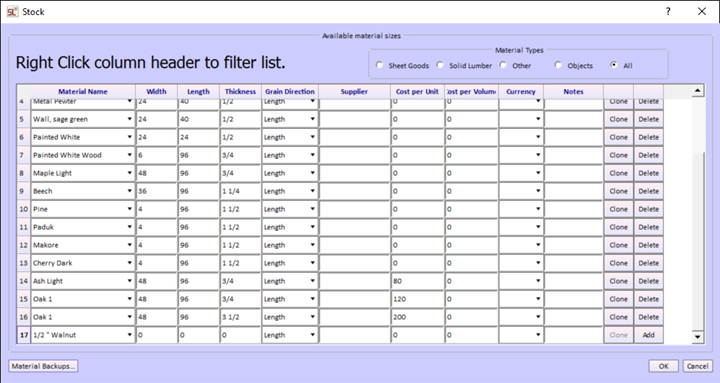
You should consider materials to use. You can go to the materials menu item top of your sketch list form and select or create materials you’ll be using for the project. There are videos that show how to select and create new materials. While you’re doing this you SHOULD go to the stock option under the material menu and size the material your project uses.

Materials information including video.
This avoids the optimize function displaying errors on all of the parts in your design. One of the most frequent optimizer error is not specifying the size of the source materials being used in the project. Again see the video in the link above.
Summary. Plan ahead and minimize mistakes. Gaining experience will speed the process.
Measure twice cut once. Ready fire aim. The best advice on creating a new project is take some time and think it through.
Size is the most important task although mistaken size can be overcome.
Naming and providing images helps you manage and identify your projects.
Some thought of materials you’re being used at only avoids issues with the optimizer but it is also a good mental exercise have you think about the details of how this project is going to come together.

