How to Create Shop Drawings in SketchList 3D Woodworking Design Software

SketchList3D woodworking design software provides a full capability to create as detailed and as dimensioned shop drawing as you desire.
Because it is integrated every time you add an object to your design, that object is automatically added to the shop drawings. (Of course it’s added to the parts list, purchase list, and optimized layout diagram as well.)
How to design shop drawings?
To create shop drawings you must be at the level on which you want to create the drawing. At the project level you can dimension the sizes of the assemblies. In order to dimension objects within an assembly you must be at the assembly level.
At the assembly level you can dimension the outer sizes of doors drawers and hardware, as well as, of course, the boards in that assembly.
In the door drawer or hardware level you can dimension objects within those containers.
You enter the dimensioning mode in SketchList 3D in one of two ways:
- Under the reports main menu item you’ll see a sub items for create shop reports.
- If you left click the button that is at the top left of every 2D image area, you can select shop drawings from the menu that appears. Select new shop drawing, or edit an existing shop drawing.
There are two types of dimensioning within SketchList 3D
One is the line length of any edge in the design.
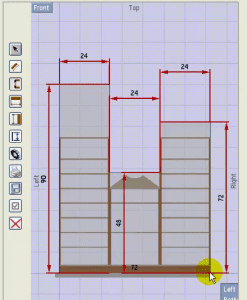
To show the length of a line, select the line tool and move the cursor over the edge you want to dimension. A dimension line will appear. Pull that line out by selecting it and moving your computer mouse.
The other mode of dimensioning is point to point.
To show the distances between two points you must activate the point tool as shown in the toolbar and with your cursor hover over one corner of the object, the red dot appears on the corner move to your next point or corner and hover the cursor until another red dot appears. When that happens, dimension line will appear between the two dots and display the number of units between the points.
To produce printed shop drawings go to the reports menu in the main menu bar. Select reports shop drawings. When the shop drawing form opens select the assembly in which the drawing exists. A list of drawings for any given assembly will appear. Pick your desired drawing from the list and click the print button. Details on these forms and variations are shown in the video contained in this post.
Dimensioning Work and Shop Drawings for furniture design
Recently we ran a survey looking for areas of improvement. The results of that survey plus some emails and phone calls I have received put me onto the issue of shop drawings. People are asking why you can’t do a shop drawing (the answer is you can really) or why is the pull down menu blank (because you haven’t created and saved a drawing.) So some training is necessary. As always I’m happy to link to someones computer and give a demo on dimensioning. But first the video…
When I asked several people if they saw the video on dimensioning and shop drawings – they said stuff like “oh, er, ah, not yet…”.
The creation of shop drawings is not all that apparent in SketchList 3D. You must first create a dimensioned drawing, save it, then go to the shop drawing report and print the drawing. The video will show you how.

I have spent months researching and asking peoples’ opinions on shop drawings: CAD people, drafting people, woodworkers, engineers. The universal feedback is that they are not all that easy to do. In the old version of SketchList we auto-generated dimension lines. What a mess. It seems like the number of lines jumped with every board added. Soon they overwrote each other.
This attempt in SketchList 3D is our first of letting you select the thing you want to dimension. Many people are satisfied with it (once they see the video).
Like anything else – the first attempt is not usually the best. In a week or so we will turn our attention to shop drawings to clean them up a bit and see what we might add and what we might do better.
(At this point, while you can put four drawings per page, it is better to just up one drawing per page.)
Suggestions welcome!!!

