Crafting Success: How Woodworkers Harness SketchList 3D for Effective Woodworking Techniques
Precision and planning are paramount in woodworking. Digital tools have revolutionized how artisans conceptualize and execute their projects. Among these tools, SketchList 3D has emerged as a favorite, offering woodworkers an intuitive platform to bring their visions to life. This article delves into the experiences of professionals who have integrated SketchList 3D into their workflows, highlighting how it enhances effective woodworking techniques.
Embracing Digital Design: A Game Changer for Woodworkers
Traditionally, woodworking relied heavily on manual sketches and physical prototypes. While these methods have their charm, they often lead to material wastage and extended project timelines. Integrating digital design tools like SketchList 3D addresses these challenges by providing a virtual environment where woodworkers can meticulously plan every detail before making a single cut.
User Testimonials: Transforming Visions into Reality
“SketchList is, without a doubt, the easiest-to-use design software I have ever encountered. It only took an hour or so before I semi-mastered the basics.” — David Disko SketchList3D
David’s experience underscores the software’s user-friendly interface, allowing even those with minimal drafting skills to quickly adapt and start designing.
“I am very happy that I found SketchList. After trying some CAD programs and SketchUp I found they weren’t optimized for woodworking. This software does the job and makes it easy.” — Rick Clifford Craftisian+2SketchList3D+2Reddit+2
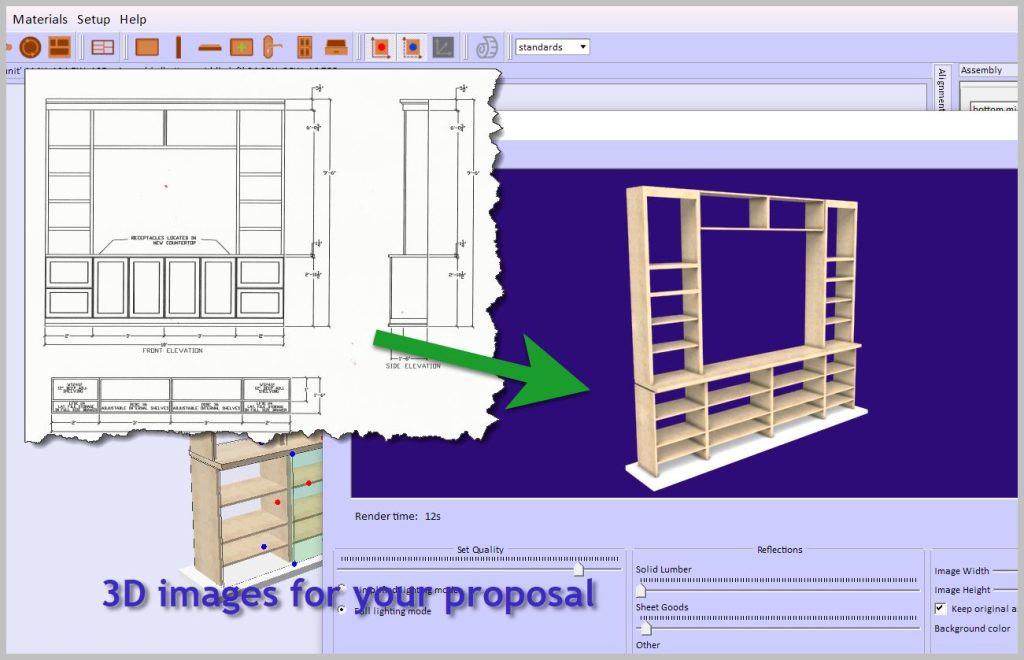
One of the standout features of SketchList 3D is its ability to produce detailed cut lists and material layouts. This functionality ensures that woodworkers can optimize their resources, reducing waste and saving costs. Moreover, the software’s 3D visualization capabilities allow users to identify potential design issues early in the planning phase, mitigating costly mistakes during construction.G2+2Capterra+2SketchList3D+2
“The parts list and cut sheets are invaluable to me in the shop. The amount of build time has decreased while the accuracy has increased.” — Roger Qualheim SketchList3D
Roger’s insights emphasize how SketchList 3D streamlines the building process, leading to more accurate and efficient project execution.
Bridging the Gap Between Design and Execution

For many woodworkers, conveying design ideas to clients or team members can be challenging. SketchList 3D addresses this by offering realistic 3D renderings, facilitating more transparent communication, and ensuring all stakeholders understand the project’s outcome.
“I have been able to give my customers views of their projects before I build them (much better than hand drawing them).” — Tom Gordon SketchList3D
Tom’s experience showcases the software’s capability to enhance client relations through detailed visual presentations.
Community Feedback: A Testament to Effectiveness
The woodworking community has been vocal about the advantages of integrating SketchList 3D into their practices. Discussions on platforms like Reddit and woodworking forums reveal a consensus on the software’s efficacy.
“I tried using SketchUp a few times, and I always got frustrated with it… Decided to give SketchList a try… it kept me going.” — Reddit User Sawmill Creek+2Reddit+2Craftisian+2
This sentiment reflects a broader appreciation for SketchList 3D’s intuitive design, which resonates with both novices and seasoned woodworkers.
Continuous Improvement: Adapting to User Needs
SketchList 3D’s development team has demonstrated a commitment to refining the software based on user feedback. This iterative approach ensures that the tool evolves in tandem with the changing needs of the woodworking community.
“SketchList stands behind their product like very few companies do! They offer an incredible service.” — Scott Becker SketchList3D
Scott’s testimonial highlights the company’s dedication to customer satisfaction, a crucial factor in the software’s widespread adoption.
Conclusion: A Tool That Elevates Craftsmanship
Good plans, drawings, and reports are your guide to effective woodworking techniques.
Integrating SketchList 3D into woodworking practices exemplifies how technology can enhance traditional crafts. SketchList 3D empowers woodworkers to refine their techniques, optimize resources, and achieve precision in their projects by offering a platform that combines ease of use with powerful features. As user testimonials and community feedback suggest, this software has become invaluable, transforming visions into tangible masterpieces.SketchList3D
In the ever-evolving landscape of woodworking, tools like SketchList 3D play a pivotal role in bridging the gap between artisanal skills and modern technology, ensuring that the art of woodworking continues to thrive in the digital age.