Categories
Blog Uncategorized Version 4

Furniture Design Software – An Approach to Manage Material

Furniutre Design - Optimized cutting Diagram

About a year ago we conducted a series of surveys both written and telephone of the existing SketchList 3D users and people who attested SketchList 3D and for whatever reason chose to purchase a license.  we found that new users had difficulty with two or three key SketchList 3D concepts. For version 4 of SketchList 3D we focused our design and programming efforts to eliminate these stumbling blocks or bottlenecks.

One of the major innovations in Version 4 has to do with the way we handle materials for boards and other parts of your designs.  In this type of furniture design software we want to provide maximum flexibility to both speed design and encourage creativity.  We found in talking to users that the requirement in version 3 to define and establish a specific material size before the design process began was a hindrance.

It was, as you may know, that if you need a specific board that is a different size than the materials already defined in your database you must leave the design process go into the material database and defined a new material.    In version 4 of SketchList  3D you need not do this.

First of all boards are not tied to an existing material size during the design stage.  Assigning a particular board or group of boards to a material size is now done during the optimization process.  So you can create any size  board in your design without concern or constraint imposed by a specify material size.  This means for example if you were working with 1 inch stock and needed a 3 inch piece for part of your design you simply change the thickness from 1 to 3 without any concern about the material database. Again this will be rectified in the optimization stage.

The only attributes you need to assign to a material are its grain texture, grain direction, and degree of transparency.   This can be done in integrated fashion within the design process.

Of course in the real world  there are definite size limits materials you can procure from a supplier.   When you set up your SketchList 3D you can enter a list of available material sizes.   SketchList 3D  will use these during optimization to make sure the layouts agree with materials you can actually obtain. During that set up stage you can also specify suppliers, manufacturers, and cost.

One of the side benefits of this new approach is that you can add  scrap pieces to the optimization process. For example if you have a partial sheet of expenses material you can edit to the available material for a specific project SketchList 3D will use that piece in the optimization.

For experienced SketchList 3D users it will take a bit to get used to these new concepts.  New users have no frame of reference and feel it should have always been this way.

Take a look at this video to get a better understanding of the process.

As always get in touch if you have any questions or comments.


Dave


Categories
Blog Contractor Demonstration Uncategorized Woodworking Business

Furniture Design Software – File Management

When someting goes wrong with your Furniture Design Software files…

I got an email from a user that we can turn into a bit of – as they say – a teaching moment.
“My computer just updated and now I have nothing…I have many projects that are just gone!  HELP!

computer destroyed

Our programmer linked into this user’s computer and found that something wierd happened to the file causing the customers  in that file  to be deleted.   It took about an hour but it was fixed.

The result was,  in the words of the user….

“Thanks for fixing this!  I was a little stressed…you guys rock!”

Now actually  the amount of emails related to file or disk failure is extremely low — like maybe one every month or so.  But disks do fail and files do become corrupt.  And the resulting work to get data back, if even possible, certainly justifies the time it takes to do some backup.

To help you better manage your SketchList 3D files I put togeter this video.
[responsive_vid]

However – the one, sure, rock solid thing I do (meaing it’s a good idea 🙂  ) is to export individual projects from SketchList 3D and save them to some external device.    Mine is a flash driture drive labeled “projects from furniture design software” work.   This way – if all else goes to, well, you can move these to another computer, or a new drive, or whatever.


More later,


Dave Rozewski

Categories
Blog Demonstration Home Office Design Uncategorized Woodworking Business

Home office – furniture design software 3d model


Finally it’s ALMOST finished.  I had been asked to put together a series of videos on one project.  I choose a desk that I might actually build someday.  The front assemblies – left and right – close back on the center unit.  The backs of those assemblies have five piece doors on them to make it look more like furniture.  It’s a case where woodworking software allows me to “build” something before I commit to it.  The shop drawings and optimized parts layout diagrams will help me do the planning.  Parts list and purchase lists – of course.

The real kicker is that the video accompanying this design is about 90 minutes long (bad – too long) BUT it is indexed so you can so directly to – for example face frames ( good – complete).

I noticed after that I overlooked hardware.  I will get to that and put on an extra segment.

If something is missing – let me know.

This video even covers file management – answering often asked questions like “How do I restore a file?”

Let me know what you think.

Thanks,


Dave

Categories
Blog Uncategorized

Drag and drop in furniture design software.

People e-mail in asking, or more specifically, demanding that SketchList 3-D should have drag and drop abilities in the design mode.  With the exception of the shaped board editor SketchList 3-D does not allow dragging and dropping of assemblies or components.  This is a specific design decision that I made for several reasons.

First of all, I almost always find drag and drop to be cumbersome.  I drag something, and either my screen resolution, my mouse, or my questionable eyesight keeps me from dropping it at the right spot.  There are graphics programs which allow you to set up a grid of points where you can do a “snap-to”.  The thing about using snap-to is that when you want to snap somewhere between two snap-to points — well, you can’t.  So then you either turn snap-to off or re-size snap-to grid.  And on and on and on.   But that’s just my point of view, based on my experience.

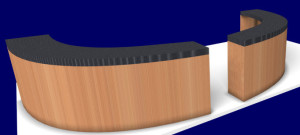
More importantly, I think it’s challenging to the point of impossibility to be working on a kitchen project that is 18 feet wide and hope that you can drag and drop something to the nearest 3/16 of an inch.  Never happen, not quickly at least!

If I want to have a cabinet 4 feet 6 3/8 of an inch from the left, the most direct way to do that is simply typing in 4 feet, 6 3/8 of an inch as the left locating dimension!  Every single time, the cabinet goes precisely where I wanted.  The software developers in the graphics design area called this parametric or parameter driven design.

The use of the drag-and-drop technique that people are asking for seems to be to make two objects butt together.  More than one user would like, in addition to drag and drop, the ability for a board to know when it’s butted against another board.  On one level, this has the same problem as the snap to grid approach.  What happens if, for whatever reason, I don’t want to board the butt but overlap.  I know this might not make sense.  But what happens if? Besides, it’s a pretty challenging technical feat for every board to know where every other board is.

In the parameter driven approach if I know a right edge of the board is at 18 7/8″, to butt a board against it I would enter the left value of the second board as 18 7/8″.  The boards meet no question about it.  And as far as speed goes, while never actually testing it, I’d bet a dollar to a doughnut, drag-and-drop is slower.

Well then why do we allow drag-and-drop in the shaped boards editor?  It’s really hard to say.  Maybe to some degree it’s a marketing concession to the drag-and-droppers of the world:)

To an extent, it makes sense in a limited and controlled geometry of a single board when you want to see exactly where the points are going to be.  But points can always still be entered by typing in their  distances from the bottom-left corner of the board.

All of this comes to the larger question of peoples’ perceptions of what design program should be and do.  New users come to SketchList 3-D from some other sort of drawing program — like a paint program on Windows.  From that point of view it sensible to think in terms of depositing rectangles on a flat plane and dragging the rectangles to create size and space, and then grabbing those rectangles in their entirety and dragging them to other places on the to be workspace. That is easy to understand and many, many people use that type of program.

But SketchList 3-D is more than a simple drawing program.  It is a 3-D furniture design software that incorporates the functions and reports needed to help woodworkers in the shop. It’s able to do this because in SketchList 3D the virtual board you create on the screen is much more than a 2D or even a 3D image.  That virtual board is a visual representation of a record in the database that contains information such as grain appearance, grain direction, source material, cost of the material, type of joinery, type of edging…

The point is there’s a lot going on with virtual boards that you don’t get with a drawing program.  It’s hard to compare apples and oranges.  And after all, I don’t like drag-and-drop not because I don’t like it but because I don’t think it’s as effective as it needs to be.

boards as design element