Categories
Basics and How to

Woodgrain Design Ideas

Accents by Woodgrain - Woodgrain


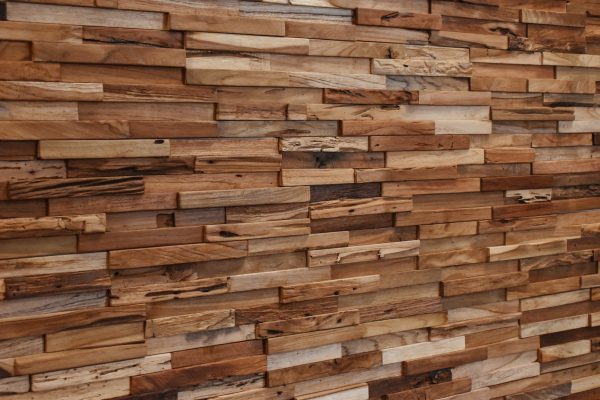
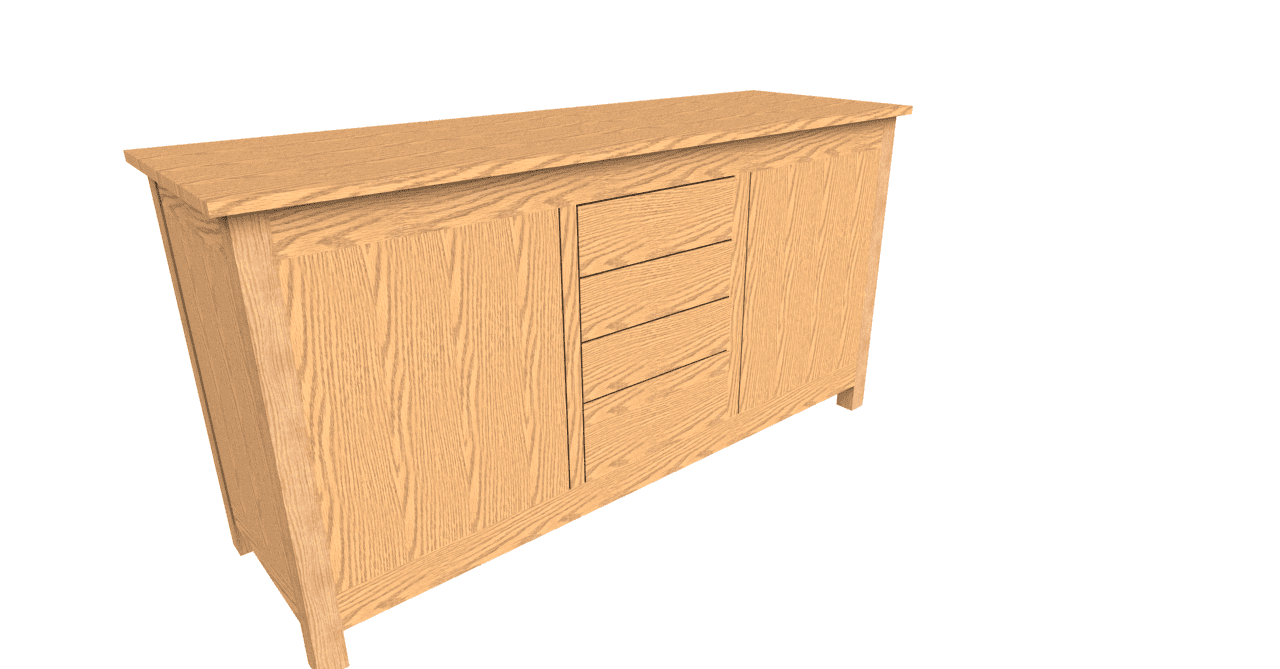
Woodgrain design:  When it comes to bringing a natural look to your cabinets, nothing beats the timeless beauty of introduced by careful selection of woodgrain. Woodgrain has been around since the dawn of time, and it’s a great way to add a touch of warmth and character to any space. From traditional to modern, woodgrain design can introduce a variety of ways to bring a natural look to your cabinetry.

Introduction to Woodgrain

Woodgrain is an art form that utilizes the natural patterns of wood grain to create beautiful and unique designs. The patterns of wood grain can be arranged in a variety of ways to create a wide range of designs, from abstract to geometric. Woodgrain design is not only beautiful, but it is also incredibly versatile. It can create everything from cabinetry to furniture, and even wall art.

Woodgrain is not just about the look; it is also about the feel. The grain of the wood can be manipulated to create textures that are smooth and luxurious, or rough and rustic. Regardless of the look you are going for, woodgrain can help you achieve it.


Benefits of Woodgrain

Woodgrain is a great way to add a touch of natural beauty to any space. It is a timeless look that will never go out of style. Woodgrain is also incredibly durable and can withstand the wear and tear of everyday life.

Wood is a natural and renewable resource that is both sustainable and eco-friendly. Utilizing woodgrain in your cabinetry ensures that you are not only getting a beautiful look but also helping to preserve our environment.


Types of Woodgrain

There are a variety of woodgrain designs to choose from. These designs range from traditional to modern and can create a wide range of looks. Some of the most popular woodgrain designs include:

  • Traditional woodgrain: Traditional woodgrain designs feature wood grain patterns that are typical of traditional woodworking. These designs create a classic and timeless look.
  • Modern woodgrain: Modern woodgrain designs feature wood grain patterns that are more contemporary. These designs create a sleek and modern look.
  • Abstract woodgrain: Abstract woodgrain designs feature wood grain patterns more abstract in nature. These designs are often used to create a unique and eye-catching look.
  • Geometric woodgrain: Geometric woodgrain designs feature wood grain patterns geometric in nature. These designs are often used to create a bold and stylish look.


How to Choose a Woodgrain

When choosing the right woodgrain for your cabinetry, it is important to consider the overall look and feel of your space. Choose a design that complements the existing décor of your home and reflects your personal style. Additionally, consider the type of wood you will be using for your cabinetry. Different types of wood will have different grain patterns, so it is important to pick a woodgrain design that complements the wood you are using.

Once you have chosen the right woodgrain design for your cabinetry, it is important to consider the installation process. Installing woodgrain design seems like a difficult and time-consuming process, so make sure you are prepared for the task.


Tips for Installing Woodgrain Design

Installing woodgrain design can be a difficult and time-consuming process, but there are a few tips that can help make the process easier.

  • Plan Ahead: Before you begin work in your design, it is important to plan ahead. Measure the space you have to work with and make sure you have all the materials you need.
  • Take Your Time: Installing woodgrain design requires patience and attention to detail. Take your time and make sure you are following the instructions carefully.
  • Use the Right Tools: Using the wrong tools can make the process much more difficult. Make sure you are using the right tools for the job.
  • Test the Fit: Before you begin installing your woodgrain design, it is a good idea to do a test fit. This will help you make sure the design fits properly and looks the way you want it to.


Trends in Design

Woodgrain design is a timeless look that will never go out of style, but there are always new trends to be aware of. One of the biggest trends in woodgrain design is the use of natural materials. Natural materials such as bamboo and cork are becoming increasingly popular, as they bring a unique look and feel to any space. Additionally, the use of dark woodgrain designs is also becoming more popular. Dark woodgrain designs bring a sense of sophistication to any space and can be a great way to add a touch of luxury to your cabinetry.

Popular Woodgrain Design Patterns

Woodgrain design is an art form, and there are a variety of patterns to choose from. Some of the most popular woodgrain design patterns include:

  • Herringbone: The herringbone pattern is a classic woodgrain pattern used for centuries. It is a timeless look that can bring a touch of elegance to any space.
  • Chevron: The chevron pattern is a modern woodgrain pattern that is becoming increasingly popular. It features a zig-zag pattern that is both stylish and eye-catching.
  • Basketweave: The basketweave pattern is a classic woodgrain pattern that is perfect for adding a touch of rustic charm to any space.
  • Plank: The plank pattern is a modern woodgrain pattern that features long, horizontal stripes. It is a great choice for creating a sleek and contemporary look.

Examples of Design Projects

Use woodgrain design variety of projects, from cabinetry to furniture and even wall art. Here are a few examples of  projects that can help inspire your next project:

  • Kitchen Cabinets: Woodgrain is a great choice for kitchen cabinetry, as it can add a touch of warmth and character to any kitchen.
  • Dining Room Table: Woodgrain design can create a stunning dining room table. The woodgrain design brings a unique and eye-catching look.
  • Wall Art: Woodgrain design can  create unique and beautiful wall art. The woodgrain pattern creates stunning and unique pieces of art.
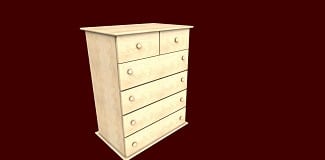
  • Dresser: Woodgrain can create a beautiful and unique dresser. The woodgrain pattern can create a luxurious and eye-catching piece of furniture.

Conclusion

Woodgrain is an art form that utilizes the natural patterns of wood grain to create beautiful and unique . It is a timeless look that will never go out of style, and it is a great way to add a touch of warmth and character to any space. Whether you are looking for a traditional look or a modern look, woodgrain can help you achieve the look you are going for. So if you are looking to bring a natural look to your cabinets, look no further than woodgrains.  Learn more about material in SketchList 3D.
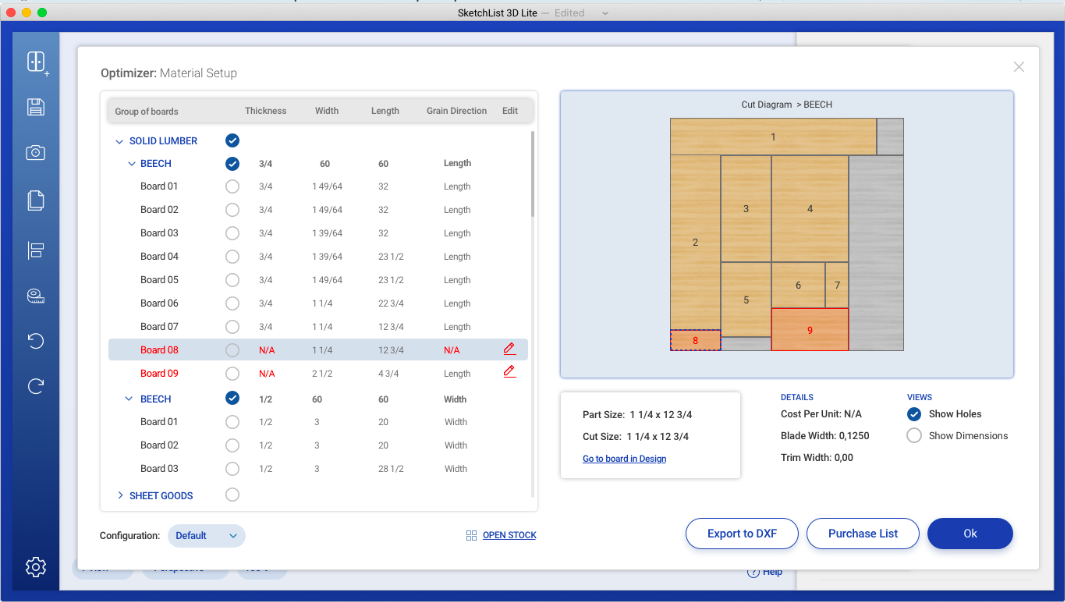
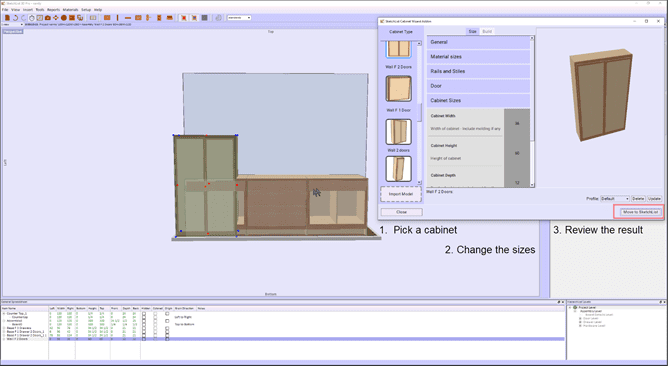


Categories
Basics and How to Version 5

Cabinet Drawings and Woodworking

How to Create Perfect Cabinet Drawings for Your Woodworking Projects!

line drawing of doors

Creating perfect cabinet drawings for your woodworking projects is essential. From choosing the right materials to understanding the basics of cabinetry construction, there are many factors to consider when making cabinets. In this blog post, we will look at different aspects of making cabinet shop drawings. We will also cover common mistakes to avoid when creating cabinet shop drawings, as well as cost-effective solutions for creating cabinet shop drawings. So, let’s get started!

Introduction to Cabinet Drawings

Cabinet drawings are detailed illustrations that provide an overall view of the structure, design, and construction of a cabinet. They can be used to construct cabinets and furniture, as well as to assist in the planning and design process. Often created using CAD (Computer Aided Design) software, allowing for precise measurements and accurate illustrations, things speed up a bit.  SketchList 3D is the leading design software for woodworking and the Go-To Tool for CNC Cabinet Making Software.

They are an indispensable tool for woodworkers. They provide a clear, detailed view of the cabinet’s design and construction, allowing woodworkers to accurately plan, construct, and install cabinets.  Drawings form the basis to create custom cabinetry that meets the specific needs of each project.

Understanding the Basics of Cabinetry Shop Drawings

Before you can begin creating your cabinet drawings, it’s important to understand the basics of cabinetry.  The shop drawings provide details that guide the construction of cabinets. They provide a comprehensive view of the structure, design, and construction of the cabinets, as well as detailed instructions for the assembly process.

Shop drawings typically include a list of materials, a description of the construction process, and detailed illustrations of the cabinet’s construction. Sometimes when using computer software to do the drawings, illustrations showing how to cut the parts from raw materials are provided. In addition, cabinetry shop drawings may include a list of tools and supplies required for the construction process.  More on that here.

When creating drawings, it’s important to pay attention to detail. All measurements and angles should be precise, and all instructions should be clear and easy to follow.

How to Create Perfect Cabinet Shop Drawings

Creating perfect cabinet shop drawings requires careful planning and attention to detail. Here are some steps to help you create perfect cabinet shop drawings:

  1. Sketch: On paper, provide measurements of all the components of your cabinet, including the dimensions of the wood pieces, the size of the hardware, and the angle of the joints. Then, use these measurements to sketch a detailed plan for your cabinet.
  2. Create a Template: Once you have a detailed sketch, you may create a template using CAD software like SketchList 3D. This template can be used to visualize the finished product and or lay out cuts on wood.
  3. Add Details: Add the details of your project to the drawings, such as the type of wood, the type of finish, and the type of hardware.
  4. Print and Check: Once you have completed the drawing, print it out and check it for accuracy. Make sure all measurements and angles are correct.
  5. Finalize: Once you have checked the template for accuracy, you can finalize the drawings and begin constructing your cabinet.

Tips for Drawing Cabinetry Shop Drawings

When creating cabinet shop drawings, there are several tips to keep in mind. Here are some tips:

  1. Make sure all measurements and angles are precise.
  2. Double-check all measurements and angles before finalizing the drawings.
  3. Use high-quality cabinet drawing software to create the cabinet shop drawings.
  4. Take your time and be patient.
  5. Collaborate with experienced woodworkers to ensure accuracy.


Common Mistakes to Avoid

When creating shop drawings, it’s important to avoid common mistakes. Here are some common mistakes to avoid when creating your drawings:

  1. Not double-checking all measurements and angles before finalizing the drawings.
  2. Using low-quality materials.
  3. Not paying attention to detail when creating the template.
  4. Not taking the time to properly plan and design the cabinet before beginning the construction process.

Conclusion

Creating perfect cabinets for your woodworking projects can be a daunting task. There are many factors to consider.

In this blog post, we looked at how to create drawings and discussed the best practices. We also cover common mistakes to avoid. With the tips and strategies outlined in this blog post, you should now have beginning knowledge and tools you need to create your woodworking projects.


Categories
Basics and How to Uncategorized

Cut List Optimizer for Woodworkers

Cut List Optimizer screen shot in SketchList 3D


Are you a woodworker? Are you tired of spending hours manually creating your cut list? There are tools that can help you. The material optimizer is one and a cut list [or part list] is another. Woodworking design software like SketchList 3D is unique because it integrates both an optimizer and a cut list report into the process of designing your work—one and the same.

What is a Cut List Optimizer?

A cut list optimizer is a tool that helps woodworkers create the most efficient cut list for their projects. It uses algorithms to analyze and optimize the dimensions of all the pieces you need to cut, making sure that you get the most out of every piece of wood. It simplifies the process of creating a cut list, allowing you to spend more time actually doing the woodworking instead of calculating and planning.

Benefits of Using a Cut List Optimizer

Using a cut list optimizer can save you a lot of time, energy, and materials. It can help you get the most out of every piece of wood, ensuring that you don’t waste any resources. It can also improve the accuracy of your cut lists, allowing you to make precise cuts and achieve better results. Finally, it can help you to plan your projects more efficiently, allowing you to maximize efficiency and minimize waste.

One of the biggest benefits of using woodworking design software is that it often combines cut list creation with the design process, so your measurements, parts, and materials stay aligned automatically as you build your project digitally. Finally, it can help you plan your projects more efficiently, allowing you to maximize efficiency and minimize waste.

Features of a Cut List Optimizer

A good cut list optimizer should offer a wide range of features.

  1. It should be able to analyze and optimize the dimensions of any piece you need to cut, as well as identify common patterns and repeatable elements.
  2. It should also be able to identify the most efficient way to cut your pieces, taking into account any restrictions or limitations you have.
  3. Finally, it should offer a simple and intuitive interface, allowing you to quickly and easily create and edit your cut list.

Those basics will get you by.  But other features such as setting the blade width [kerf size], allowing filtering of the report by material type and assembly, and producing a purchase list of materials needed for a given job are very nice to have.

The Process of Creating a Cut List

Creating a cut list is a complex process. It involves measuring and calculating the dimensions of all the pieces you need to cut, as well as identifying common patterns and repeatable elements. It can be difficult to do this manually, as it takes a lot of time and energy.

With SketchList the complexity goes away.  Each board you add to your design is assigned to a material.  The software checks to make sure the new board actually fits onto the material.  As you move along with your design adding new boards, those boards are separated by material types, species, and sizes and mapped onto the material.  For example all the parts on 1/4 inch plywood map again the material you specify for them.   The optimization process is the design process.

How a Cut List Optimizer Works

A cut list optimizer works by analyzing and optimizing the dimensions of all the pieces you need to cut. It takes into account any restrictions or limitations you may have, as well as any common patterns or repeatable elements. It then identifies the most efficient way to cut the pieces, making sure that you get the most out of every piece of wood.

How to Use a Cut List Optimizer

Using a cut list optimizer is easy. All you need to do is input the dimensions of the pieces you need to cut, as well as any restrictions or limitations you may have. The optimizer will then analyze and optimize the dimensions, identifying the most efficient way to cut the pieces. You can then use the optimized cut list to make precise and accurate cuts.

Again with SketchList you are inputting the parts sizes and you virtually cut and place the board into your work.  So no extra steps are needed.

Advantages of a Cut List Optimizer

Using a cut list optimizer can offer a number of advantages. It can save you a lot of time and energy, as it automates the process of creating a cut list. It can also improve the accuracy of your cut list, allowing you to make precise and consistent cuts. Finally, it can help you to plan your projects more efficiently, allowing you to maximize efficiency and minimize waste.

Popular Cut List Optimizers

There are a number of popular cut list optimizers available on the market. Some of the most popular include CutList Plus.  It offers a range of features, allowing you to easily and quickly create and edit your cut list.  However it does not include a design function so you must first draw out your design, make a parts list with sizes, and enter them into the spreadsheet for importing.

Conclusion

If you’re a woodworker, then a cut list optimizer is a must-have tool. It can save you a lot of time and energy, as well as improve the accuracy of your cut list. It can also help you to woodowrking workshop plan your projects more efficiently, allowing you to maximize efficiency and minimize waste. So, what are you waiting for? Try a cut list optimizer today and unlock new levels of efficiency in your woodworking projects!

Categories
Basics and How to Uncategorized

Storage cabinet – considerations before you design

Maximizing Your Space with the Right Storage Cabinet

‍When it comes to organizing your home or office, having the right design is key.   This essential piece of furniture helps keep your space tidy and clutter-free.  This article covers a general approach to cabinets, doors and drawers , office cabinets, kitchen cabinets  and the bathroom storage cabinet.

In this article, we’ll take a look at the benefits of having a cabinet, the different types of cabinets, and tips for designing and organizing one. So, let us get started!

Cabinet: a type of furniture that has multiple compartments for organizing and storing items. It can come in many different shapes, sizes, and materials. Most are made from wood, metal, or plastic. Some cabinets also have doors or drawers that can be locked to keep your items safe and secure.

Use storage cabinets in many different areas of your home or office. They are ideal for organizing your tools, documents, books, and other items.

Having cabinets can make your life a lot easier. Here are some of the benefits:

    • They help to organize your items and keep your space tidy.
    • They increase the amount of usable storage space in your home or office.
    • They help to keep your items safe and secure.
    • They store items that are not frequently used, such as old books or clothes.

Benefits of having cabinets in the office

Having a storage cabinet in the office can be beneficial in many ways. It can help to organize your documents and keep them safe. It can also help to keep your office tidy and clutter-free. Having them in the office can also help to improve productivity since it can help to keep your workspace organized.

Benefits of having cabinets in the garage

Having cabinets in the garage can be beneficial in many ways. It can help to organize your tools, such as hammers, wrenches, and screwdrivers. It can also be used to store gardening tools, sports equipment, and other items that are used on a regular basis. Having a cabinet in the garage can also help to keep your garage organized and clutter-free.

Popular cabinet styles

There are many different types of cabinets available. One way to look at them includes office  cabinets, kitchen storage cabinets and a bathroom storage cabinet.

Beyond that here are some of the most popular cabinet styles:

  • Wall-mounted:  These are ideal for saving space in your home or office. They can store items used on a regular basis, such as tools or documents.
  • Freestanding:  These provide flexibility, especially if mounted on wheels, allowing them to move anywhere.
  • Cabinets with doors: Ideal for keeping your items safe and secure. They can also store items not frequently used.
  • Garage storage systems: Proper design makes them ideal for organizing your tools and other items used on a regular basis.

Different materials used for storage cabinets

Storage cabinets can be made from many different materials. Here are some of the most common materials used for storage cabinets:

  • Wood: Wood is a popular material for cabinets because it is strong and durable. Stained or painted cabinets match your home or office decor.  Many find this more aesthetically pleasing than other types of storage cabinets.
  • Metal: Metal is a popular material for cabinets because it is strong and durable.
  • Plastic: Plastic is a popular material for cabinets because it is lightweight and affordable. It is also easy to clean and maintain.

Tips for designing the right cabinet

When it comes to choosing the right storage cabinet for your home or office, there are a few things to consider. Here are some tips for choosing the right storage cabinet:

  • Determine what type of items you need to store: Before you buy a storage cabinet, you should determine what type of items you need to store. This will help you choose the right size and type of storage cabinet.
  • Measure the available space: You should measure the available space in your home or office before you buy a storage cabinet. This will help you choose the right size and type of storage cabinet.
  • Consider the material: You should also consider the material of the storage cabinet you are buying. Different materials offer different levels of durability, so it’s important to choose the right material for your needs.
  • Consider the style: You should also consider the style of the storage cabinet you are buying. Different styles offer different levels of aesthetics, so it’s important to choose the right style for your needs.

Tips for organizing your storage cabinet

Once you’ve chosen the right cabinet for your needs, it’s time to organize it. Here are some tips for organizing your cabinet:

  • Sort your items: Before you start organizing your storage cabinet, you should sort your items.
  • Label your items: Once you’ve sorted your items, you should label them. This will help you find items quickly and easily.
  • Store items in the right compartments: Once you’ve labeled your items, you should store them in the right compartments. This will help you keep your storage cabinet organized and tidy.
  • Use dividers: If you need to store items of different sizes, you should use dividers. This will help you keep your items organized and easy to find.

Conclusion

Having the right storage cabinet is key when it comes to organizing your home or office. It can help to keep your items safe and secure, and it can also help to maximize the amount of usable storage space in your home or office. There are many different types of design possibilities so it’s important to create the right design for your needs. Once you’ve chosen the right design, it’s time to organize it. By following the tips in this article, you can maximize your space with the right cabinet.  More information about office cabinets, kitchen cabinets and bathroom cabinet exists here. 

Categories
Basics and How to

Wood design software meshes the 5 steps in woodworking

Wood Design Software – More than Reports

For some people, the advantage of using the SketchList 3D carpentry & woodworking design software is the ability to see the design in three dimensions and generate cultists or part lists when finished. For others, it’s the ability to have high-quality 3D renderings to replace their lower quality, time-consuming pencil and paper sketching efforts.  However, as we continue our Tuesday at Wednesday evening classes about using the woodworking software, I am starting to see there’s a definite advantage in the process itself. Perhaps this is what some users mean by “like the process”  with our woodwork software.

Image of computer used for woodworking design

To understand the differences in the flow between the real-world design and building the shop approach and that of the virtual approach, I think you have to go back to the basic cycle of steps in the real world way. I’ve researched how different authors and woodworking teachers describe the process of making something in wood. I like the article Basics of Woodworking: A Step by Step Process by the Tool Guy.  He lays out the steps to building in wood.


                    1. Planning
                    2. Gathering materials.
                    3. Measuring and cutting
                    4. Fitting
                    5. Gluing and nailing


Now it might seem like a relatively simplistic view of the process, especially for experienced woodworkers. But if you want to understand something,  break it down to its simplest steps.

Physical approach

We look at the – let’s call it – the physical way of doing this with the wood guys five steps. You see that it’s very sequential.  one step follows the other you couldn’t fit the parts before you cut them, and you can’t cut them before you gather the materials .  and you can but probably shouldn’t gather materials before you finish your plan. The other thing you might notice about these five steps is that the steps tend to be, let’s say, done in batches. Pretty much, it doesn’t make sense to do a dry fit of the parts until you’ve gotten some minimal number of pieces set aside that you can indeed fit together.

The other thing is in the physical world; you’re depending on the physical structure of what you’re making to be developed before you can finish the drift. For example, it’s hard to put the tabletop in place until the legs and the skirt or framing or whatever you call it is there to hold the legs together.

Sequential

The problem with the physical approach, and of course we’ve all learned to live with it over the past, is that it is not really sequential.  It does not go from step one to step two and so on. When you are at Step 4, for example, fitting, you may need to go to step one planning.  Indeed, depending on how much cutting you’ve already done, that can become a real costly problem. Not to mention a waste of time.

The other difficulty introduced is a physical separation between steps one and two, planning and material gathering, and the rest. Steps four and five cutting fitting and gluing happened in the shop. So you are back and forth between the shop, and you’re planning station to finish the job. Sometimes more back and forth and you like.

Virtual approach

In contrast, the virtual planning approach offered by woodwork design software has those same steps, but the line between them is not at all hard

Think of it. You get as many do-overs as necessary. Rather than do-overs, which imply you’ve made a mistake, let’s call them revisions. That sounds better.  And beyond revisions, you have as many opportunities to explore alternatives as you want. Usually, after your design is complete, making modifications, such as changing sizes or adding or deleting drawers, takes seconds or minutes.

The virtual approach’s final advantage in wood design software is that these revisions instantly update all reports without any work on your part. Now that’s not true for all would planning software.  We know of products out there that require you to generate the report after doing this design. Changes to the design need retrofitting into the reports.    If you want more information on the usefulness of cut lists see this.

Let’s follow the  Air Tool Guys 5 steps and apply them to a design of a workbench using SketchList 3D wood design software. Furthermore, for those keen on exploring miter saw bench design as an alternative option click here.

Let’s explore an example

The very rough plan is this.  We want to design a bench to build for our shop.  It’ll be made of 2 by 4s, maybe 4 by 4s, and 4 by 8 sheets of three-quarter-inch plywood.  There will be a shelf and a benchtop.  The length of the bench will be 96 inches more or less, the height will be 36 inches, and the depth will be something in the area of 24 inches.  Use a depth that lets you cut two pieces of shelving from one sheet of plywood.

So we have step one planning and step two gathering materials out of the way.  When we go to the physical shop.  Sure we have to make a stop at the physical lumberyard and buy the materials.  But enough of that for now.

With SketchList 3D let’s define a project that is 120 inches wide by 72 inches deep by 48 inches tall. That is roughly the area  where we want to put the table

“Cutting” parts

Next, it’s time to start “cutting parts” from the 4 by 4.  The first part to cut is a table leg which will be 35 inches tall.  Then we put that table leg to the front left 2 inches in from the left and the front of the assembly.  Now I’ll accuse the clone and space function of the SkechList 3D wood design software of making 7 copies of the leg. There will be three across the front for a total of four.  And there will be 4 legs across the back.

Select the 2 by 4s and start to cut parts from them.  At first cut the parts at some arbitrary length, say one foot.  Then  “dry fit” that first frame member 6 inches off the floor and to the left of the first leg I inserted.

Next,  take the right edge of that frame board and drag it to the table leg toward the right.  Then we clone that frame two more times, fitting the clone boards between the other legs.  In another minute or two, we take each of those six frame boards clone and space them, so they’re at the back of the table. Now work on the frames that connect the legs front to back. Then follow the same process “cutting another frame board”.  Use an arbitrary size of 12 inches, “dry fitting” it to the back of the front left leg.  Then dragging the frame to connect to the back leg.  Using the old clone and space trick you can “cut” three more of those short frames and space them between the other three pairs of table legs.

In a few minutes, you can take all of those frames, clone them, and space them so that their tops or at the top of the table legs.

Next, “cut” the surface of the shelving and the tabletop starting with the plywood on the lower shelf left side.  Set the sizes of this part in one or two clicks and keystrokes.

Then clone two copies of the shelf plywood and “dry fit” them as needed on top of the framing. Now repeat with the plywood the process of cloning the left shelf material and moving it upward to rest on top of the upper frame. The second clone copies toward the right, essentially finishing the design.  This example didn’t deal with joinery or cutting out the notches around the table legs. But these take several minutes of work in the wood design software package.

Finally

You can adjust and modify all you want because you see the 3D rendering of your idea. Once satisfied, generate the reports, especially the purchase report, drive off to the lumberyard to get my physical material. Go back to the shop where the fun continues.

To summarize, the virtual approach with wood design software offers several advantages beyond simply having excellent drawings and an accurate cut list. Other advantages of using wood design software lie in the process. It’s a dynamic and interactive activity where you can easily explore all the details involved in your project. Mistakes are virtually free. There is zero chance of cutting off a thumb. And you don’t have to worry about sawdust. There might be one disadvantage now that I mentioned sawdust – the virtual approach doesn’t have that pleasant fresh wood aroma. But who knows, we might add that in someday.

Categories
Basics and How to

DXF files from SketchList 3D – a VCarve Tutorial.

How to use SketchList 3D generated DXF files in VCarve

VCarve image

Want to learn about DXF files and VCarve?  Then read on.  Ralph Bagnall has been a CDC advisor and consultant to SketchList for nearly ten years.   He is highly qualified in the area of CNC training.  A professional woodworker for more than 20 years, he is also a woodworking author, writing articles and books on woodworking  This experience has given him an extensive background in CAD, CAD/CAM, and 3D programming.  He had used every type of software from a $40 2D Drafting program to a true 3D modeling program costing tens of thousands of dollars.   From time to time he joins our Sketchlist 3D evening meetings to share ideas on CNC setup training, answer questions about software and hardware, and provide you with his opinions.

 A few words from Ralph:

“I first learned how to program and operate CNC machines in the wood industry back around 1997, and after 20 years, I still enjoy running them and watching them work. So when Fox Chapel Publishing asked me to write a beginner’s guide to CNC machines {a guide to CNC set up training}, I jumped at the chance. Now a lot of things have changed since I started out. You no longer need to handwrite every X, Y coordinate into the program, the software does most of the work for you. And designs can be imported into the machine directly from programs like SketchList, allowing much faster and flexible designing. Maybe the biggest change is that CNC machines are now available in sizes and prices that fit into many home wood shops.”

First SketchList

As Ralph said many times VCarve is the market leader.  And he usually adds that SketchList 3D is a great software ‘partner’ that allows you to easily create designs to feed into VCarve.  For this first segment of this post, I created a YouTube video showing how to design a side of a cabinet.   Because I am using SketckList to create the design and the dxf file is an automatic by-product of that design – everything is complete in one process.  The dados and shelf pin holes are applied in SketchList and placed in the DXF file for VCarve to use. [Note – this video was made with V4.  V5 is the current version which makes this even easier. If you’d like a step-by-step tutorial, check out our guide: How to use SketchList 3D generated DXF files in VCarve.


Then VCarve

Then in the second YouTub video, Ralph uses the VCarve software to import the DXF file and create both the tool path and the code.   Because of his expertise, he explains a great detail in a very organized fashion.


More CNC info.

Categories
Basics and How to

Best furniture design software? SketchList 3D is on the list.

The best furniture design software – want to know more?

A 3D rendering of a wooden kitchen hutch

Then consider what TechWiser found when they wrote about the best furniture design software.   Who are they?  According to their website:

They started in 2012 as a  tech media firm that aims to make people’s lives better by educating them on how to use their tech product(s) in the most efficient way possible.  Techwriter publishes software recommendations, how-to’s, product reviews, and useful hacks.  The company has a significant online following, serving over 1.5 million monthly page views globally.  While their YouTube channel serves over 1 million views every month.

Spoiler – SketchList 3D is fourth on their list.

BUT the author was indeed knowledgable enough to recognize the difference between the first three and SketchList 3D.  Well, there are several differences.  But this is the key.  He understood that the first three were CAD software products, as opposed to the best cad software for designing furniture.   CAD software furniture marketing package.   And he got it that we designed SketchList 3D specifically to design furniture and cabinets.  The author called that approach “purpose-designed”.  That is opposed to a general CAD program. [Read my thoughts on CAD if you like.]

So we might say that in the category of  “purpose-designed” furniture design – SketchList 3D was #1.  Well, you might.

But see what else they found.

“SketchList is purpose-designed software that lets you create any type of furniture design you want. Being a purpose build software, it has almost everything a woodworker or designer needs to design good furniture. Those features include drag and drop objects, Snap-On objects, alignment tools, one-click contours, One-click joints, drill hole emulation, wood types, custom materials, etc.

The greatest asset of SketchList is its ease of use and the detailed how-to articles and videos showing usage and tricks of the software.

If you are looking for a purpose-built software that is straightforward to use, then go with SketchList.”

If you’ve been reading about SketchList 3D you know we say it allows you to virtually build your work as if you were in your workshop.  It does.  But maybe a better term is purpose-built.  It’s built to help you with your purposeful effort to create better designs.

Categories
Basics and How to Wizard

Bathroom vanity plans – make your own

Custom bathroom vanity plans that you can easily modify to fit your room, style, and budget.


Preprinted DIY bathroom vanity plans that you buy have two basic problems.

  • First, they present designs that are fixed size.  If you want stock cabinets you would save time and go to a box store and buy them.  Of course, if you have a wall that is 57 inches wide for your bathroom vanity – you can either buy a 48-inch width cabinet and make spacers to the ends, OR you can buy the 60-inch width and – oh no that is not such a good idea.
  • Second, leaving size aside for the minute let’s talk style.  While a Google search bathroom vanity plans uncovered 33 MILION pages, ironically the style you want may not be there.  Or maybe it is but you have to find it.  Your bathroom might be one of the more expensive remodels you do in your house.  Don’t you want it exactly as you want?  Maybe a rustic bathroom vanity plans, or something more modern.

Why not design your own?  Or build it even?  Well if you’re not the building type you can still create your own DIY bathroom vanity plans, to your styles and sizes, and present it to your cabinet maker.  Trust me he or she will love the idea that the plans are for quoting.  The other advantage of the plans is that they give you a way of communicating what you want to the contractor – even if adjustments happen later.  My experience it that they always happen!

You or your contractor can create your truly custom plans with the Cabinet Wizard from SketchList.   It is simple.

  1. Open Cabinet Wizard and pick a cabinet for your bathroom.
  2. Edit the sizes, materials, and cabinet making standards just by typing.
  3. Move to SketchList 3D and locate it in the bathroom.
  4. Repeat with another cabinet if necessary.

Cabinet Wizard comes with 11 free cabinets for you to use for your bathroom vanity plans.   The basic collection includes wall and base, drawer stacks, door and drawer combinations, doors only.

Watch this video of me creating a nice custom bathroom vanity in minutes.

 For more information on the Cabinet Wizard read this post and watch the video it contains.

Categories
Basics and How to

Dresser design software creates a dresser

Dresser Design Software within  SketchList 3D


3D rendering of a light wooden dresser on a dark red background

A furniture maker wrote in asking if SketchList 3D dresser design software could help him create a dresser model.  I created the model from images he sent me using our dresser design software.  Pretty much the whole gamut of SketchList 3D tools worked together to make the project.   And that involves heavy use of red dots [resize objects], blue dots [locate objects], clone and mirror and clone and space,  in addition to the align tool.

The carcass consists of five boards – left and right sides, top and bottom, and of course the back.  And because the case is frameless no rails or stiles appear.

The project shows the details of putting together the drawers.  While there are more videos online to show that – well this is a six drawer dresser so we made drawers for it!

I recorded the making of the dresser in a video you can watch below.

This is a desk I created with our desk design software.  There are four full sized and two half sized drawers.  We mounted knobs on the drawer fronts.  And feet support the entire project.

The design in the video makes heavy use of SketchList 3D’s tools red dot resizing, blue dot locating, cloning, and the align function. So it provides a great review of how to use them in the dresser  design tool.

Just so you know, the entire design took less than 30 minutes with our dresser design software.  And that of course includes the cut list, shop drawings, and material layout diagrams.

Keep an eye out for an upcoming post where I re-do the dresser as a the SketchList 3D addon Wizard model.

If you own SketchList 3D and would like a copy of this project contact us. If you want a free 30-day trial go to www.sketchlist.com.

Here is a link to a site with more ideas on what you might make with our dresser design software.