Categories
Basics and How to Blog Uncategorized

How Cabinet Design Software Is Transforming Woodworking

In the world of woodworking, precision is everything. Whether you’re crafting a custom kitchen, building a bespoke entertainment center, or designing a sleek home office, the difference between a flawless fit and a frustrating redo often comes down to millimeters. For decades, woodworkers relied on hand-drawn plans, physical mock-ups, and trial and error to bring their visions to life. But today, a new generation of tools is reshaping the craft, led by cabinet design software that blends technical accuracy with creative freedom. 

This post examines how cabinet design software is transforming the way professionals and passionate DIY enthusiasts approach cabinetry, from concept to completion. 


What Is Cabinet Design Software? 

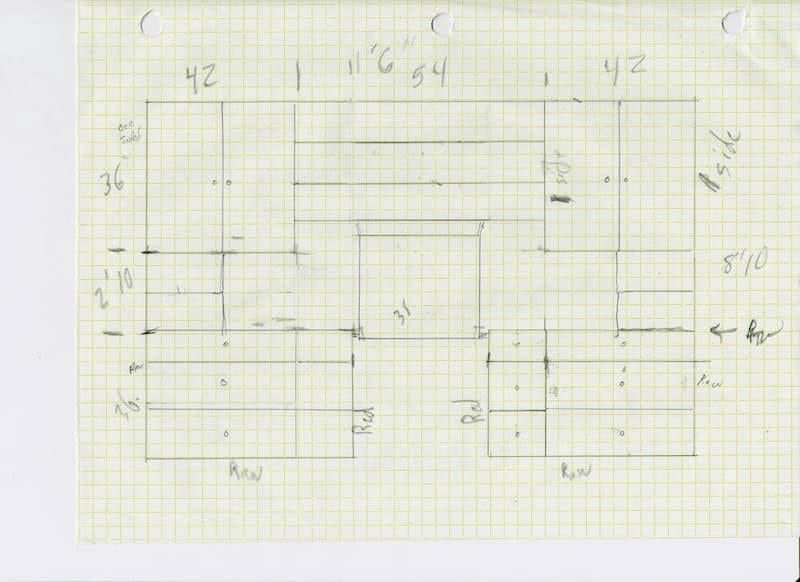
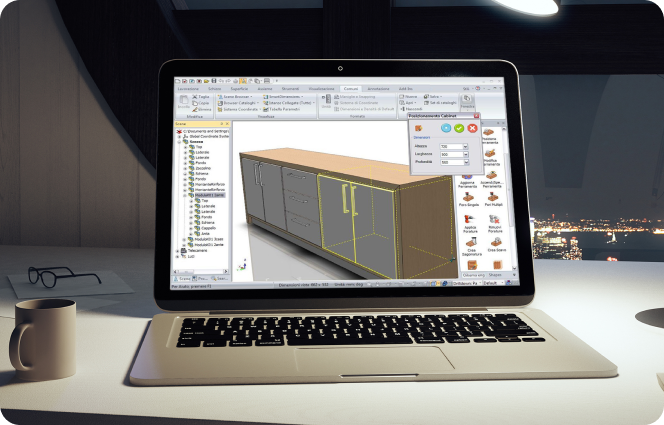
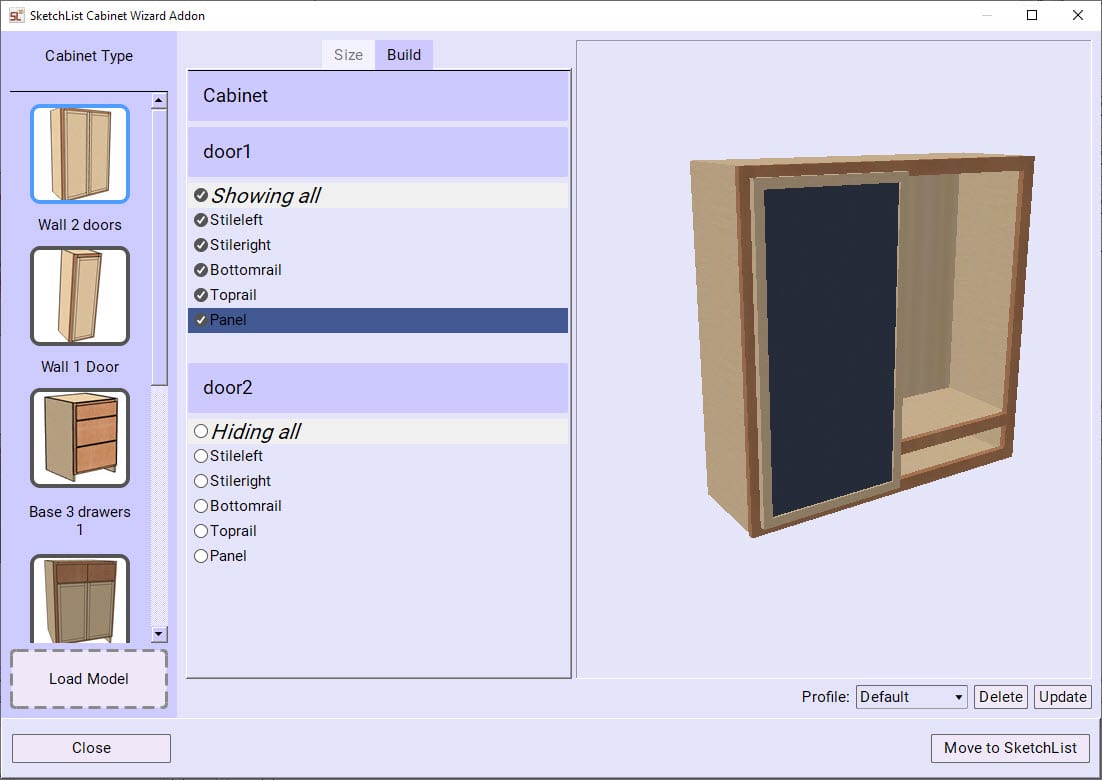
Cabinet design software is a specialized digital tool that allows users to plan, visualize, and refine cabinetry projects in a virtual environment. Unlike general-purpose CAD programs, cabinet design software is purpose-built for woodworking. It understands the nuances of cabinet joinery, material thickness, hardware placement, and construction logic. 

Key features typically include: 

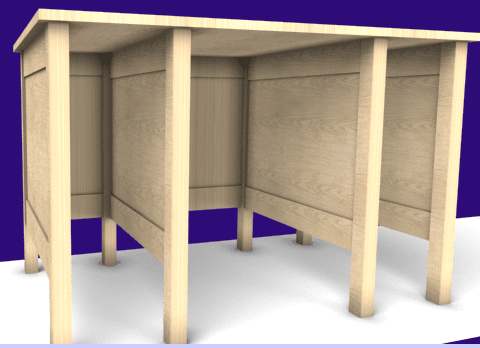
  • 3D modeling of cabinets, drawers, doors, and shelving 
  • Material libraries with wood types, finishes, and edge treatments 
  • Cut lists and part breakdowns for efficient fabrication 
  • Dynamic resizing and parametric design to adapt to space constraints 
  • Integration with CNC machines or export to printable plans 

Whether you’re designing a single vanity or an entire kitchen, cabinet design software helps you visualize the final product, catch errors early, and streamline production. 


Why Cabinet Design Software Matters For Woodworkers

Traditional cabinet design workflows often involve a mix of paper sketches, verbal instructions, and manual measurements. While this can work for simple projects, it introduces risk and inefficiency as complexity grows. Cabinet design software eliminates ambiguity by creating a shared visual language between designer, client, and builder. 

Here’s how it transforms each stage of the process:

1. Conceptual Design

Instead of rough sketches, users can build virtual prototypes with precise dimensions and realistic textures. Want to see how cherry wood looks with matte black pulls? Swap materials in seconds. Need to adjust a cabinet height to accommodate plumbing? Just drag and resize.

2. Client Collaboration

Clients often struggle to visualize 2D plans. Cabinet design software bridges that gap with immersive 3D renderings and walkthroughs. This not only improves buy-in but reduces change orders and miscommunication.

3. Production Planning

Once a design is approved, the software generates detailed cut lists, part diagrams, and even CNC-ready files. This minimizes waste, speeds up fabrication, and ensures consistency across builds.

4. Installation Confidence

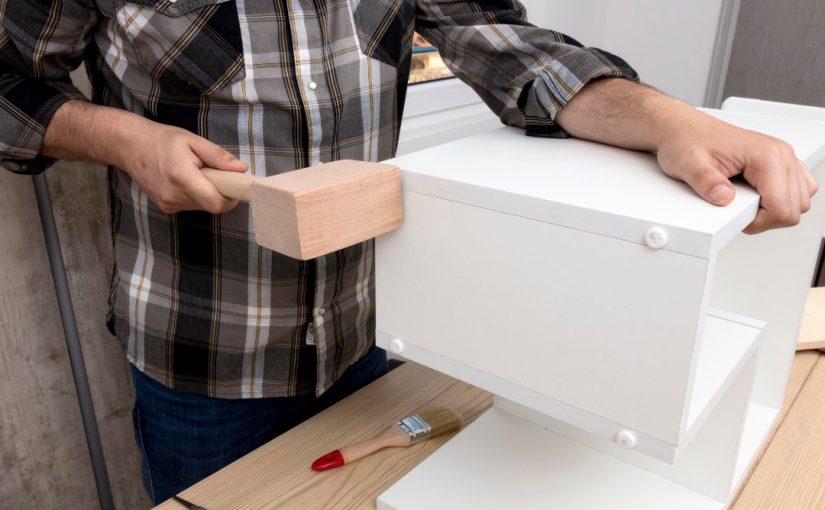
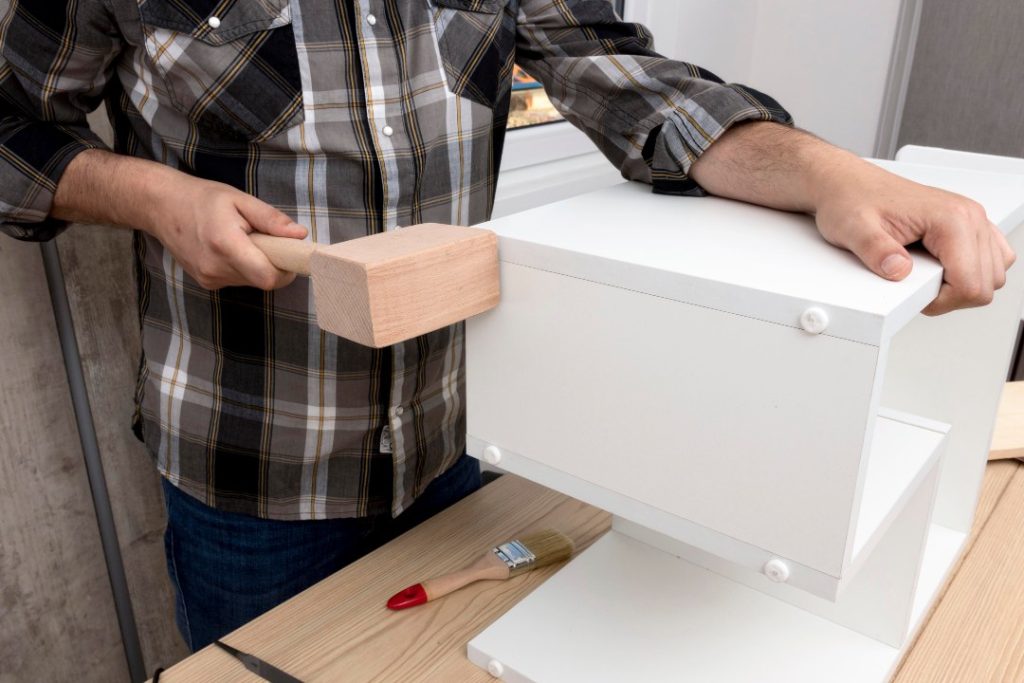
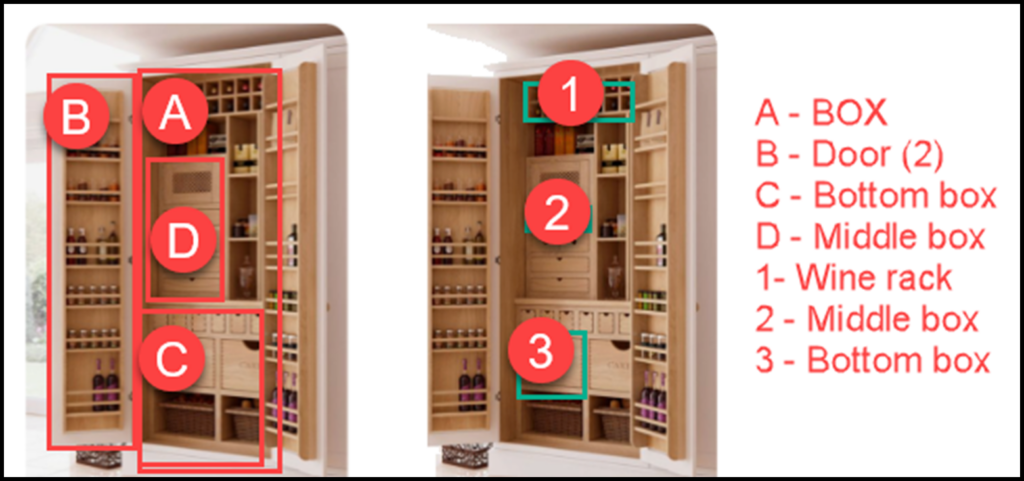
Installers benefit from precise measurements and exploded views that clarify how each component fits together. No more guessing or retrofitting on-site. 


Smart Cabinet Design Meets Craftsmanship 

One of the most powerful aspects of cabinet design software is its ability to combine algorithmic logic with human creativity. For example, parametric design allows users to define rules, like “all upper cabinets must be 12 inches deep”, and apply them across the project. Change one variable, and the entire design updates intelligently. 

This is especially useful for: 

  • Modular systems with repeating elements 
  • Space-constrained environments like RVs or tiny homes 
  • Custom kitchens with varying appliance sizes 

But software doesn’t replace craftsmanship. it enhances it. Woodworkers still choose joinery methods, select materials, and make aesthetic decisions. The software simply removes the guesswork and lets artisans focus on what they do best: building beautiful, functional cabinetry. 


Choosing the Right Cabinet Design Software 

Not all cabinet design software is created equal. Some are geared toward large-scale manufacturers, while others cater to solo woodworkers or design studios. When evaluating options, consider:

FeatureWhy It Matters

Content

Intuitive interfaces reduce learning curves and speed up adoption
Customization
Ability to define your own cabinet styles, materials, and hardware
Integration
Export options for CNC, PDF, or other fabrication workflows
Support & Community
Tutorials, forums, and customer service can make or break your experience
Cost & Licensing
Some tools offer one-time purchases, others use subscription models

For high-end DIYers and small shops, look for software that balances power with simplicity, something that doesn’t require a CAD degree but still delivers professional-grade results. 

Real-World Impact: Stories from the Shop 

Consider a custom cabinetmaker who specializes in high-end kitchen remodels. Before adopting cabinet design software, each project required hours of manual drafting, client revisions, and on-site adjustments. After switching to a digital workflow, they halved their design time, reduced material waste by 20%, and experienced a noticeable increase in client satisfaction. 

Or take a passionate DIYer building a home office. With cabinet design software, they could experiment with layouts, test different wood finishes, and generate a precise shopping list, all before making a single cut. The result? A polished, professional-looking build that felt tailor-made. 

These stories aren’t rare,they’re becoming the norm. 


The Future of Cabinet Design 

As technology continues to evolve, cabinet design software is poised to become even more powerful. Expect features like: 

  • 3D photo previews that let clients “place” cabinets in their space 
  • Online collaboration for remote teams and client feedback 
  • Sustainability tracking to optimize material usage and reduce waste 

For woodworkers who embrace these tools, the future is bright. Cabinet design software isn’t just a productivity booster, it’s a strategic asset that enhances creativity, improves communication, and elevates the craft. 


Final Thoughts 

Cabinet design software is more than a digital sketchpad, it’s a bridge between vision and execution. Whether you’re a seasoned professional or a weekend warrior, these tools empower you to design with confidence, build with precision, and deliver results that delight. 

In a world where customization is king and efficiency is essential, cabinet design software offers the best of both. It’s time to trade the pencil for the pixel, and unlock a new era of woodworking excellence. 

Ready to experience it for yourself? Explore the free trial and view pricing to see how cabinet design software can elevate your next project.

Categories
Basics and How to Furniture Design Software SketchList 3D – Guides Woodworking Business

Parametric Design vs CAD – Woodworkers Beware the Difference

Parametric Design vs CAD:  In the world of design, particularly in fields such as woodworking, architecture, and manufacturing, the tools and techniques you choose can significantly affect the outcome of your projects. While the terms drawing, CAD, and 3D modeling may sometimes be used interchangeably, they each have distinct characteristics and applications that can serve different needs. Let’s dive into the differences and see how each method can benefit your design process.


 Drawing (2D)


image of wall unit


  • Drawing is the traditional method of creating flat representations of objects by hand with paper and pencil or digitally using software like AutoCAD in 2D mode.
  • It provides a clear view of an object through flat views such as top, front, and side elevations. Think of it as the foundational step in visualizing your ideas.
  • One of the most significant drawbacks of traditional 2D drawing is the lack of depth or volume, making it challenging to visualize complex designs.
  • Picture a blueprint for a cabinet, clearly showing the height, width, and depth dimensions but without a view of how those elements come together in three-dimensional space.


person looking at screen


CAD (Computer Aided Design)

  •  2D CAD (like AutoCAD 2D): This functions more like a digital drawing with tools for enhanced precision.
  •  3D CAD (like SolidWorks and Fusion 360): This brings depth into the mix but often involves complex workflows that might require a steeper learning curve.
  • Presents a digital way to create precise technical drawings or 3D models.
  • It’s widely used in engineering and architectural designs, integrating measurements, materials, and technical specifications into the plans.
  • Traditional CAD programs can be quite complex and sometimes demand solid technical knowledge, which can be challenging for beginners.
  • Think of a CAD plan of a kitchen cabinet, complete with cut lists and detailed joinery specifications. This can be exceptionally helpful in ensuring accuracy before you even start working with your materials.


Screen showing SketchList design with keyboard for cabinet design software

 3D Modeling

As the name suggests, 3D modeling focuses on creating three-dimensional representations of objects that can be visualized from any angle.

  • Primarily aimed at enhancing visualization, prototyping, and realistic representation of designs.
  •  More straightforward to visualize compared to 2D CAD.
  •  Ability to simulate materials, textures, and lighting realistically.
  •  Some software can generate reports automatically, such as cut lists and material layouts.


Example: Picture a 3D cabinet model that allows you to rotate, zoom, and see how each part fits together. This will give you a complete understanding of your project before making cuts.

woodworking software image of cabinet


 Summary of Differences


Feature

Drawing (2D)

CAD 3D Modeling
Dimension 2D 2D & 3D Fully 3D
Ease of Use Easy Can be complex Easier than CAD for visualization
Visualization Flat views Some 3D features Fully interactive models
Best for Simple plans layouts Engineering, technical design Concept design, woodworking, furniture making

Parametric Design vs. CAD Drawing: Which is Best for Woodworking?

Choosing the right software in woodworking design can mean the difference between efficiency and frustration. Traditional CAD drawing and parametric design are two common approaches, but they serve different purposes. Parametric Design vs. CAD is a key distinction. If you’re a woodworker looking to streamline your workflow and improve accuracy, understanding these methods’ differences is essential.

What is CAD Drawing?

CAD (Computer-Aided Design) drawing is a digital version of manual drafting, allowing designers to create 2D or 3D representations of objects. While CAD is widely used across industries, its approach is still largely manual and static.

How CAD Works

  • Objects are drawn using lines, arcs, and shapes.
  • Dimensions are manually assigned to different components.
  • Each change to a drawing often requires manual adjustments to related parts.

Limitations of CAD for Woodworking

  • Time-consuming edits: Adjusting one part does not automatically update others.
  • Lack of relationships: Objects contain no information about what they are, do, or are made from.
  • Manual resizing: If you modify a design, all dependent components must be adjusted separately.

For example, if you design a cabinet in AutoCAD, resizing it means you have to manually adjust shelves, doors, and supports, which can lead to extra work and potential errors.

What is Parametric Design?

Parametric design takes a different approach by defining objects using rules, parameters, and relationships instead of just shapes and lines. This means components are linked, so changes in one part automatically update the others.

How Parametric Design Works

  • Uses constraints (e.g., “this board is always 3 inches thick”).
  • Components have built-in relationships, so modifying one element affects the entire design.
  • The software calculates and adjusts all related dimensions instantly.

Key Benefits of Parametric Design for Woodworkers

  • Faster modifications: No need to manually adjust each part when making changes.
  • Consistency and accuracy: Ensures all components stay correctly sized and aligned.
  • Less repetitive work: Once parameters are set, modifications require minimal effort.

For example, in SketchList 3D, if you increase the width of a cabinet, all connected parts—doors, shelves, and supports—automatically adjust to fit. This eliminates tedious recalculations and ensures design accuracy.

CAD vs. Parametric Modeling: Which One is Better?

Feature CAD Drawing Parametric Design
Editing Manual adjustments required Automatic updates based on rules
Relationships No built-in relationships Components adapt to changes
Flexibility Limited, time-consuming edits Highly flexible and dynamic
Error Reduction Prone to inconsistencies Ensures consistency
Best for Basic layouts, technical drawings Complex, adaptable designs

Why SketchList 3D is a Game-Changer for Woodworkers

SketchList 3D is designed specifically for woodworking, combining the best of parametric modeling with an easy-to-use interface. Unlike traditional CAD programs, which can be complex and time-consuming, SketchList 3D allows you to:

  • Quickly modify designs without redoing entire drawings.
  • Automatically generate cut lists and reports as you design.
  • Visualize projects in realistic 3D, making client presentations easier.

If you’re tired of struggling with manual CAD adjustments, parametric design with SketchList 3D can save you time, reduce material waste, and help you create more accurate designs.

Final Thoughts on Parametric Design for Woodworking

While CAD drawing has its place, parametric design offers a far more efficient solution for woodworkers who need flexibility and precision. If you want to spend less time fixing design errors and more time building, a parametric modeling tool like SketchList 3D is the way to go.

If you are wondering where SketchUp falls in this discussion, read this.

For more information, see this.

Ready to upgrade your workflow? Try SketchList 3D and experience the benefits of parametric design for yourself!  See why many call it the best software for woodworking.


Categories
Basics and How to Blog

Maximize the Use of a Desk Design Software

What is Custom Desk Design Software, and Why Should I Consider One? 

In the realm of furniture design, a custom desk design software emerges as an invaluable tool. It allows designers and woodworking enthusiasts to bring their creative ideas to life. Providing a 3D visualization, accurate measurements, and a plethora of customization options, such software has revolutionized how desks and other pieces of furniture are conceptualized. But what are the specifics to look for when considering one? Let’s delve into the key features of the best 3D furniture design software. 

Key Features to Look out for in a Custom Design Software 

When searching for the right tool, it’s crucial to seek out a software that has: 

  • Precision and Accuracy: This ensures your designs are practical and can be brought to life without issues. 
  • Intuitive Interface: So even those new to design can easily navigate and utilize its features. 
  • Variety of Customization Options: From materials to sizes, the more options, the better. 
  • 3D Visualization: A must-have for getting a real feel of the final product. 

To dive deeper into the world of furniture design, explore the best 3d furniture design software. 


Custom desk design software with Sketchlist 3D

Why Choose Sketchlist 3D as Your Custom Desk Software 

For those seeking the best software to design a desk, SketchList 3D stands out as the top choice among the plethora of desk design software available. Here’s why: 

Woodworking-Focused Interface 

Unlike other generic wordworking CAD or free desk design software options, SketchList 3D’s woodworking design software is meticulously crafted for woodworkers. It seamlessly integrates familiar woodworking terms and practices, ensuring that those in need of an office desk design software or a general-purpose custom desk design software can focus on designing without fussing over navigation. 

Automated Reporting Tools 

Whether you’re a novice or professional, the right desk design software should be efficient. SketchList 3D excels by transforming your intricate designs into actionable plans with ease. With features that automatically generate everything from material layouts to purchase reports, it’s clear why many regard SketchList 3D as the best software to design a desk, especially in terms of accuracy and time savings. 

Real-time Error Detection 

Mistakes can be costly, both in terms of time and resources. As a leading custom desk design software, SketchList 3D ensures that users can spot potential design issues in real-time. This proactive approach guarantees that corrective measures are taken early, preventing minor glitches from escalating into major setbacks. 

Supportive Community and Resources 

More than just a tool, SketchList 3D prides itself on being a holistic platform for woodworkers. Users get access to an array of resources, ranging from insightful video guides to enriching weekly workshops. This extensive community and support network means that whether you’re searching for a free desk design software or a more comprehensive solution, with SketchList 3D, you’re always in good hands. 

Discover the full benefits of SketchList 3D and explore our comprehensive Video Tutorial section. 

 Common Mistakes to Avoid When Designing Desks 

Ignoring Ergonomics 

Any reliable desk design software will emphasize the importance of ergonomics, let’s remember how a custom desk should offer comfort and efficiency. Failure to consider factors such as legroom, monitor height relative to the user’s eye level, and the positioning of the keyboard and mouse can result in an uncomfortable workspace. 

Overlooking Storage Needs 

Office desks, in particular, need ample storage. Some novice designers might use their free desk design software to create aesthetically pleasing designs but forget about functionality. It’s important to keep in mind potential items on the desk, from electronics to stationery, and include the right storage solutions. 

Not Considering Cable Management 

In this digital age, using software to design a desk without considering cable management is a common oversight. Options like built-in grommets, channels, or under-desk hooks should be considered. 

Using the Wrong Materials 

Your custom desk design software can help visualize your project, but it’s up to you to select the right materials. The desk should be sturdy and durable, capable of supporting desktop items and resisting wear and tear. Always prioritize quality materials that ensure longevity and stability. 

Disregarding Room Layout and Space 

Whether you’re using office desk design software or a general one, always consider the room’s layout and size. A design that doesn’t complement the room can be counterproductive. Proper measurements and a clear understanding of how the desk integrates into the room’s overall design are pivotal. 

For more insights, explore our pricing and videos. 

FAQs 

1. What do desk designers consider when designing?  

Designers prioritize functionality, aesthetics, ergonomics, and the intended user’s needs. 

2. Can you design a desk or other furniture with Sketchlist 3D?  

Absolutely! SketchList 3D is versatile, allowing designs for a range of furniture pieces. 

3. Is it free to use Sketchlist’s desk design software? 

We offer a free 30-day trial. Beyond that, there are various pricing options available. 

4. What is the best software to design a desk? 

SketchList 3D is among the top choices for its comprehensive features and user-friendly interface. 

Sign Up For a 30-Day Free Trial 

Ready to bring your desk designs to life? Dive into the world of 3D desk design with SketchList 3D. Experience precision, a suite of tools, and an intuitive interface all at your fingertips. Sign Up Now for a free trial and start your design journey! 


Categories
Basics and How to

Types of Drawer Slides for Cabinets

Discover the different types of drawer slides and how they enhance drawer design.

types of drawer slides


Drawers are a fundamental piece of furniture in most households. They are used to store all kinds of things, from clothes to tools, and they come in various styles and designs. But have you ever thought about the mechanism underneath the drawer that allows it to open and close? That mechanism is called a drawer slide. 

In this article, we will take a look at the different types of drawer slides available and how they can be used to enhance drawer design. We will also discuss the benefits of the different types and provide tips on how to choose the right type and, of course, how you can effortlessly add these to your designs with SketchList 3D’s cabinet design software.

What are Drawer Slides? 

Drawer slides, also known as drawer glides or runners, are the mechanisms that allow drawers to open and close smoothly. They are mounted on the sides, bottom, or even underneath the drawer, depending on the slide type. 

Drawer slides come in various sizes and styles, but they all have the same basic components. They consist of two parts: a stationary part, usually attached to the cabinet or furniture piece, and a moving part, which is attached to the drawer itself. The two parts are connected by a set of rollers or bearings, which allow the drawer to open and close smoothly. 

Drawer Slides Types 

Drawer slides come in several different varieties. Each has its own advantages and disadvantages, so it’s important to understand the differences between drawer slide types before making a purchase. 

1. Side Mount 

The most common type of drawer slide is the side-mount slide. As the name suggests, these slides are mounted on the sides of the drawer. They are typically made from metal and have a pair of tracks that the drawer slides on. Side-mount slides are generally less expensive than other types of slides, but they are also not as durable. 

2. Bottom Mount 

Bottom-mount slides are similar to side-mount slides, but instead of being mounted on the sides of the drawer, they are mounted on the bottom. This type of slide is more expensive than side-mount slides, but they are also much more durable and offer better stability. 

3. Undermount 

Undermount slides are mounted underneath the drawer, which makes them great for drawers that are too shallow to accommodate side- or bottom-mounted slides. They are more expensive than side- or bottom-mounted slides, but they offer a much smoother operation. 

4 .Push-to-Open 

Push-to-open slides are a newer type of drawer slide that does not require the user to pull the drawer open. Instead, the user simply pushes the drawer in a certain direction to open it. These slides are more expensive than other types of slides, but they offer a more modern look and a smoother operation. 

5. Soft Close 

Soft-close slides are a type of slide that slowly and quietly closes the drawer. This is great for keeping drawers from slamming shut, which can be noisy and can cause damage to the drawer over time. Soft-close slides are more expensive than other types of slides, but they offer a more luxurious feel. 

6. Center-Mount 

Center-mount slides are positioned under the center of the drawer and run from the front to the back of the drawer. They are often single slides, making them ideal for smaller drawers. While they don’t bear as much weight as side-mount or undermount slides, they are a popular choice for traditional wooden dressers and antique furniture due to their discreet placement. 

7. Top mount 

Top-mount slides are fixed to the top of the drawer, making them particularly useful for situations where side or bottom space is limited. They’re commonly seen in pull-out trays or bins. Their unique positioning allows for wider drawers, and they are often chosen for their ease of installation and adaptability to unconventional drawer designs. 

8. Self-Close 

Self-close slides are designed to pull drawers fully closed with just a slight push. They utilize a spring mechanism that ensures the drawer shuts securely every time. This feature is particularly beneficial in preventing partially open drawers, ensuring a tidy appearance, and reducing the risk of accidental bumps or snags. 

kitchen cabinet drawer slides

Benefits of Different Types of Drawer Slides 

Each type of slide has its own set of benefits. Side-mount slides are the most affordable option and are great for applications where cost is a concern. Bottom-mount slides are more expensive, but they offer better stability and durability. Undermount slides are great for shallow drawers, while push-to-open slides offer a more modern look and feel. Finally, soft-close slides provide a luxurious feel and keep drawers from slamming shut. 

How to Choose the Right Drawer Slide 

When choosing the right drawer slide for your needs, there are several factors to consider.  

Load rating 

Before making a choice, assess the items you plan to store in the drawer. For heavier items like tools or kitchenware, opt for slides with a higher load rating to ensure stability and longevity.  

Drawer Movement Direction  

Consider how you want the drawer to move. Traditional slides allow for horizontal movement, but there are also slides designed for vertical or multi-directional movement. The direction can influence both the functionality and aesthetic of the drawer.  

Extension Length  

The extension length of drawer slides dictates how far the drawer can extend outwards. Full-extension slides provide complete access to the drawer’s contents, while partial-extension slides leave a section of the drawer concealed within the cabinet.  

 Durability  

The durability of drawer slides is determined by their material and build quality. Metal slides, especially mounted slides, tend to offer more durability than their plastic counterparts. It’s essential to consider the drawer’s intended use and the surrounding environment when evaluating durability. 

Cost  

While it’s essential to find a slide that meets your functional needs, it’s also important to factor in your budget. There are various options available at different price points, so assess the features you truly need and find a slide that offers the best value for your money.  

Weight and Size of the Drawer  

The physical dimensions and weight of the drawer influence the type of slide you should choose. For instance, a heavy and deep drawer might benefit from a bottom mount or undermount slide for added support. Conversely, a shallow drawer might be best suited for an undermount slide to maximize space.” 

Drawer Slide Installation Tips 

Once you have chosen the right drawer slide for your needs, it’s important to install it correctly. Make sure you read the instructions provided with the slide carefully and follow them step-by-step. It’s also a good idea to measure the drawer and the cabinet to ensure that the slide will fit properly. 

When mounting the slide, make sure to use the appropriate hardware. Many slides come with screws and brackets that are designed for the slide. If you are unsure of what type of hardware to use, consult the manufacturer’s instructions or ask a professional for help. 


Common Problems & Solutions 

Once you have installed the drawer slide, it’s essential to check it regularly to ensure it is working properly. If you notice any problems, such as the drawer not opening or closing properly or the slide making too much noise, you may need to make some adjustments. 

The most common problem with slides is that they become loose over time. To fix this, tighten the screws that hold the slide in place. If the slide is not functioning correctly, you may need to replace the rollers or bearings. 

FAQs 

1. What is the difference between undermount and bottom-mount drawer slides? 

Undermount slides are positioned beneath the drawer, hidden from view, offering a clean look and maximizing drawer width. Bottom mount slides, on the other hand, are fixed to the drawer’s bottom edges, often visible when the drawer is open and slightly reducing the drawer’s width. 

2. Are undermount drawer slides worth it? 

Absolutely. Undermount drawer slides provide a sleek appearance as they’re concealed from view. They also offer a smooth operation and often come with features like soft-close mechanisms. Their design can enhance the overall aesthetics and functionality of furniture pieces. 

3. What are the different types of drawer slide extensions? 

Drawer slide extensions refer to how far a drawer can pull out. The primary types include: 

  • Partial Extension: The drawer opens partially, leaving some of its contents inside the cabinet. 
  • Full Extension: The drawer opens fully, providing complete access to its contents. 
  • Overtravel Extension: The drawer opens more than its length, offering extra access, especially in deeper cabinets. 

4. Are all drawer slides the same?  

No, drawer slides vary in design, functionality, and material. They can differ in terms of mount type (side, bottom, undermount, etc.), extension length (partial, full, overtravel), and special features (soft-close, push-to-open). The choice of slide often depends on the specific requirements of the furniture piece and personal preferences. 

5. What are the common drawer problems and signs that it needs to be fixed? 

Common drawer issues include: 

  • Sticking or Jamming: The drawer doesn’t open or close smoothly. 
  • Misalignment: The drawer doesn’t sit flush with the cabinet. 
  • Noisy Operation: The drawer makes squeaking or grinding noises. 
  • Failed Closure: The drawer doesn’t stay shut or pops open. 
  • Damage: There’s noticeable wear, bending, or damage to the slides. 

If you notice any of these signs, it’s an indication that the drawer might need repairs or a slide replacement. 

Conclusion 

Drawer slides are an essential component of drawer design and can enhance the look and feel of any piece of furniture. There are five main types of drawer slides available, each with its own set of benefits and drawbacks. When choosing a drawer slide, it’s important to consider the weight, size, look, and cost of the drawer. It’s also important to install the slide correctly and to check it regularly for any problems. With the right slide, you can ensure that your drawers open and close smoothly for years to come.  

SketchList 3D transforms the challenge of integrating drawer slides into a seamless experience. With its intuitive woodworking planner and design tools and real-time visual feedback, you can create precise slide placements, ensuring perfect alignment and functionality in your designs. Experience the difference firsthand with our 30-day free trial. Not sure where to start? No problem; our tutorial videos and furniture blogs stand ready to enhance your skills and spark creativity. Alternatively, feel free to contact us any time.

See this article on drawers in SketchList 3D

Key Takeaways 

  • Drawer slides, essential for smooth drawer operation, come in various types, each with distinct benefits and applications. 
  • Different types of drawer slides, such as side mount, bottom mount, and undermount, have their own unique advantages and applications. 
  • Factors like load rating, drawer movement direction, extension length, durability, and cost play a crucial role in choosing the right drawer slide. 
  • Regular checks and maintenance of drawer slides can prevent common problems like misalignment, noisy operation, and sticking or jamming. 
  • SketchList 3D offers an intuitive solution for integrating drawer slides, ensuring precision and functionality in designs. 


Categories
Basics and How to Wizard

Cabinet Design App: The Wizard Speeds Things Up

SketchList 3D – Wizard Cabinet Design App – Automating Woodworking Design

Over the past decade, the need and demand for a 3D cabinet design programhas increased.  As cabinet makers and custom woodworkers strive to implement woodworking design software in their businesses, they face the trade-off between detail in design and the time required to learn and use it. 
Being successful in the software design business requires us to address this time/detail trade-off so that customers experience the best balance. Generally, if you want a greater amount of detail in your design, you need to invest more time. But that is changing. The Wizard for SketchList 3D woodworking design app is an add-on that allows customization of designs in less time. In fact, it only takes 3 easy steps: 

  1. Select a pre-designed model
  2. Adjust it as needed 
  3. Generating your cut lists and shop drawings

What is SketchList’s Cabinet Design Software Wizard? 

Our cabinet design app provides a collection of standard cabinet models. At this point, the library consists of kitchen cabinets. However, over time, we will make more types and styles of cabinets and furniture. Assemblies created in the Wizard library are inserted into a SketchList 3D project. This is one source of the speed. Because the cabinet selected gives you a base or starting point for modification, with these seed cabinets, even the most inexperienced cabinet maker can design cabinets. And for the Pros, for whom time is money, the speed is a real benefit.
If you need to customize a model, the Wizard cabinet design app provides the ability to modify 70 variables. This means you can adjust every important aspect of your cabinet. Now, these details provide the flexibility to change key parameters and achieve your own custom designs. 

What Can Cabinet Design Software Do for You? 

The wizard allows you to control 70+ variables. That may seem like a large number. But in most cases, you just accept the default value. And once you enter your own parameters, you can save them for future use.  

This is a short list of variables you can modify: 

  • Cabinet sizes. First and foremost, it allows you to change the size of any cabinet by changing the height, width, and depth. 
  • Size of stiles and rails. You set the width and height of your framing members as well as change them once or change them for every job. 
  • Overlay sizes for doors and drawers. Because you set both the overlay sizes and the door or drawer thicknesses, the design fits the way you build cabinets. 
  • Toe kick height and depth. It’s easy to change the toe kick sizes adjust the size and location of all the parts of the cabinet. 
  • Thicknesses of sheet goods and dimensions lumber.  Just type in the sizes. 
  • Clearance distances for inset doors and drawers. 
  • Parts included. Picking which doors, drawers, or boards are in the design. 

So, why should you consider this simple but powerful 3D cabinet design app? 

SketchList 3D Wizard brings several advantages to the table: 

Ease of Use: Even if you’re new to cabinet design, the Wizard’s intuitive interface ensures a smooth learning curve. 

Flexibility: It offers a vast array of customization options, ensuring that your design aligns perfectly with your vision. 

Efficiency: With the Wizard, you can drastically reduce the time spent on designing, allowing you to focus on the craft itself. 

Cost-Effective: Time saved is money saved. With faster designs, you can take on more projects and increase your revenue. 

Here are some steps to help you get started: 

Open the Wizard by clicking on the Wizard icon at the top of the SketchList 3D main screen.  It is just to the left of the material layout icon.
This window opens.

Screenshot of SketchList 3D's Wizard Adon showing the feature in use

On the left of the form is a list of cabinets. Remember idea with SketchList 3D Wizard is that you select a cabinet from this collection to modify. That cabinet will be displayed in a 3D image to the right of the Wizard screen. You can move that image around to examine your cabinet from any direction. More models of cabinets and furniture will be available. In fact, we can even create a custom model for your project. 

At this point, you might click “move to SketchList 3D”.   

Then you might select another cabinet and move it to SketchList 3D.  When your assembly is moved, you can use it (if you choose) to change more details with the SketchList 3D tools. For example, you may want to cut a shape into a board or might need to place a hole, but not all cabinets will need further modification. Of course, in many cases, you can simply print the reports you need to build that cabinet. 

 The Wizard cabinet design softwarehas two ways of modifying cabinets.
In the center section of the Wizard cabinet design app screen, you see two tabs: size and build.
The size tab allows you to change any of the sizes of materials, parts, board locations, or the assembly.  Please note that the way the Wizard differs from SketchList 3D is that, in SketchList, you create and edit on a board-by-board basis. While this gives you great control over detail, it takes time. With the Wizard, your edits are on an overall assembly basis. The effects of changes cascade to each part of the design affected by that edit. 

 For example: 

If you need to change all the plywood in this assembly from three-quarters of an inch to 5/8 of an inch: 

  • Scroll to the parameter labeled plywood thickness one. 
  • Double-click the .75 value. 
  • Type in .625.  [NOTE as of today the Wizard supports only decimal values.  In this case, our 5/8 would be entered as .625.] 
  • As soon as you click enter, SketchList modifies all plywood value of ¾ to 5/8. And, importantly, it adjusts all the sizes of other boards that are affected by this change in thickness. 

The build tab allows you to set which boards, drawers, or doors will be included in the assembly when it’s moved to SketchList. 

This post introduces you to our new offering.

The Wizard is an add-on for SketchList 3D.  We are several weeks away from release but wanted to share this exciting new approach to custom woodworking design with you.
Our goal for the Wizard is to get you started quickly with your designs.   The Wizard will accomplish a great deal – even allowing for adjustments and changes.
Over the next few weeks, we’ll be making improvements based upon user feedback who give the Wizard a try.  Also over time we’ll discover more and more ways to apply the Wizard tool to the work of woodworking design.

Conclusion 

Cabinet design is a breeze when you have the right tools at your disposal. The SketchList 3D Cabinet Wizard aims to do just that, allowing you to focus on the craftsmanship and artistry of your projects and cut out any of the other unnecessary steps in between. If you’re curious to see everything our software can offer, consider trying our 30-day free trial. Or find out more about what our software includes here. 

For deeper insights and hands-on guidance, check out our cabinet design tutorial videos and furniture blogs, or simply send us a message. 


Categories
Basics and How to

DIY Bookshelf Building: A Comprehensive Guide to Planning Your Project

DIY Bookshelf Building


As an avid reader and DIY enthusiast, I have always been drawn to the idea of building my own bookshelf. Not only is it a practical addition to any home, but it also provides a sense of accomplishment and personalization to a space. In this comprehensive guide, I will share with you everything you need to know about DIY bookshelf building, from the advantages of building your own bookshelf to common mistakes to avoid. So grab your tools and let’s get started!

Advantages of Building Your Own Bookshelf

There are numerous advantages to building your own bookshelf. First and foremost, it allows you to customize the design to fit your specific needs and preferences. Whether you want a particular size, shape, or style, building your own bookshelf gives you the freedom to create a piece that is uniquely yours. Additionally, DIY bookshelf building is often more cost-effective than purchasing a pre-made bookshelf, especially if you already have some of the necessary tools and materials.

Building your own bookshelf also provides a sense of accomplishment and satisfaction. There is something very rewarding about creating a functional and beautiful piece of furniture with your own two hands. Furthermore, DIY bookshelf building is a great way to learn new skills and techniques, as well as to challenge yourself creatively.

Types of Bookshelves to Build

Before you start your DIY bookshelf building project, it’s important to consider the type of bookshelf you want to build. There are several different options to choose from, including:

  • Wall-mounted bookshelves: These bookshelves are attached directly to the wall and can be customized to fit any space.
  • Freestanding bookshelves: These bookshelves can be moved around and are not attached to the wall. They come in a variety of shapes and sizes, including ladder-style bookshelves and cube bookshelves.
  • Built-in bookshelves: These bookshelves are built directly into the wall and provide a seamless look. They are often more challenging to build but can add significant value to your home.

When choosing the type of bookshelf to build, consider your space limitations, design preferences, and skill level.

Tools and Materials Needed for Building Bookshelves

To build a DIY bookshelf, you will need a variety of tools and materials. Some of the most essential tools include:

  • Saw (hand saw or power saw)
  • Drill and drill bits
  • Screwdrivers
  • Measuring tape
  • Level
  • Sandpaper
  • Clamps
  • Hammer

As for materials, you will need wood or another material for the shelves, as well as brackets or other hardware to support the shelves. Depending on the type of bookshelf you are building, you may also need additional materials such as paint or stain, wood glue, and screws or nails.

Measuring and Planning Your Bookshelf Project

Before you start building your bookshelf, it’s important to take accurate measurements and plan out your project. This will help ensure that your bookshelf fits properly in your space and that you have all the necessary materials.

Start by measuring the height, width, and depth of the space where your bookshelf will go. Then, determine the number of shelves you want and the distance between them. You may also want to sketch out a rough design for your bookshelf to help you visualize the finished product.

Once you have your measurements and design, you can create a materials list and purchase everything you need.

Step-by-Step Guide to Building a DIY Bookshelf

Now that you have your tools, materials, and plan in place, it’s time to start building your DIY bookshelf. Here is a step-by-step guide to help you get started:

  1. Cut your shelves to the desired width and length using a saw.
  2. Sand the edges of each shelf to smooth them out.
  3. Measure and mark where you want each shelf to go on the wall or support brackets.
  4. Attach the brackets to the wall or support structure using screws and a drill.
  5. Place the shelves onto the brackets and secure them in place with screws or brackets.

Remember to take your time and double-check your measurements throughout the process. It’s also a good idea to have a helper to hold the shelves in place while you attach them to the brackets.

Tips for Building Built-In Bookshelves

Built-in bookshelves can be a bit more challenging to build than freestanding or wall-mounted bookshelves. Here are a few tips to help you successfully build built-in bookshelves:

  • Take accurate measurements of the space where you will be building the bookshelves.
  • Use a level to ensure that your bookshelves are straight and level.
  • Cut and fit each shelf individually to ensure a snug fit.
  • Use wood glue and screws to secure each shelf in place.
  • Finish the bookshelves with paint, stain, or another finishing material to match your decor.

Decorating and Styling Your Bookshelf

Once you have built your DIY bookshelf, it’s time to decorate and style it. Here are a few tips to help you get started:

  • Arrange your books by color, size, or genre for a visually appealing look.
  • Mix in decorative items such as plants, vases, or framed photos to add interest.
  • Consider adding lighting to your bookshelf to highlight your favorite books or objects.
  • Don’t overcrowd your bookshelf – leave some empty space to allow each item to stand out.

Remember, the key to decorating and styling your bookshelf is to make it reflect your personal style and interests.

Common Mistakes to Avoid When Building Bookshelves

While building a DIY bookshelf can be a rewarding and fun project, there are some common mistakes to avoid. Here are a few to keep in mind:

  • Not measuring accurately: Taking accurate measurements is crucial to ensure that your bookshelf fits properly in your space.
  • Not using the right tools: Using the wrong tools can lead to mistakes and a less-than-perfect finished product.
  • Not securing shelves properly: Properly securing each shelf is important for safety and stability.
  • Rushing the project: Take your time and don’t rush the project, as this can lead to mistakes and a less-than-perfect finished product.

Recommended Resources for DIY Bookshelf Building

If you’re looking for more information and inspiration for DIY bookshelf building, there are several resources available. Here are a few of my favorites:

  • www.sketchlist.com and see this post.
  • DIY Network: This website offers a variety of tutorials and videos for building bookshelves and other DIY projects.
  • Pinterest: Use Pinterest to search for bookshelf building ideas and inspiration.
  • Home Depot: Home Depot offers a variety of tools and materials for building bookshelves and other DIY projects.

Conclusion

Building your own bookshelf is a fun and rewarding DIY project that can add both function and style to your home. By following the tips and guidelines outlined in this comprehensive guide, you can successfully plan, build, and decorate your own DIY bookshelf. So grab your tools and get started today!

Categories
Basics and How to Version 5

Furniture design app used to design kitchen storage.

Introduction to SketchList 3D

furniture desing app image

As a furniture making using a furniture design app, I have spent a lot time in the design process. From conceptualizing a design to creating a 3D model, it can be a time-consuming and tedious process. However, with the SketchList 3D app, I have found a solution that streamlines my workflow and makes the design process more efficient.

This is a project video in which a fairly complex design is done in SketchList 3D. Although a bit long at 20 minutes, it does a good job in showing the flow of the process, the way the library is used to get a quick start, and how most of the tools are used to quickly achieve your design. And remember this is a starting point from which you can explore modifications until you reach the perfect solution.

SketchList 3D is a furniture design app that has revolutionized the way I approach design. The app is specifically designed for woodworkers, furniture makers, and cabinet makers, making it the perfect tool for the job. It has a wide range of features that make designing furniture a breeze.

Benefits of using SketchList 3D for furniture design

One of the main benefits of using SketchList 3D for furniture design is the time-saving aspect. With this app, I can quickly create a 3D model of my design, which saves me a lot of time. It also allows me to see my design from all angles, which helps me to spot any potential issues before I start building.

Another benefit of using SketchList 3D is the accuracy of the measurements. When designing furniture, getting the measurements right is crucial. With SketchList 3D, I can input the exact measurements of each piece of wood and get a precise 3D model. This means that I can be confident that my design will fit together perfectly when I start building.

Features of SketchList 3D app

SketchList 3D has a wide range of features that make it the perfect app for furniture design. One of the key features is the ability to create a 3D model of your design. This allows you to see your design from all angles and make any necessary adjustments before you start building.

Another great feature of SketchList 3D is the ability to create a cut list. When designing furniture, it’s essential to know exactly how much wood you need for each piece. With SketchList 3D, you can input the dimensions of each piece, and the app will generate a cut list. This saves a lot of time and ensures that you have the right amount of wood for each piece.

SketchList 3D also has a 3D rendering feature, which allows you to see what your design will look like in real life. This is a great way to get a sense of how the finished product will look and make any necessary adjustments before you start building.

How SketchList 3D improves furniture design workflow

SketchList 3D has improved my furniture design workflow in several ways. Firstly, it has made the design process much quicker. With the ability to create a 3D model of my design, I can quickly see what it will look like and make any necessary adjustments. This means that I can spend more time building and less time designing.

SketchList 3D has also made the design process more accurate. When designing furniture, accuracy is crucial, and SketchList 3D ensures that my measurements are precise. This means that I can be confident that my design will fit together perfectly when I start building.

Tips for using SketchList 3D for furniture design

If you’re new to SketchList 3D, here are some tips to help you get started. Firstly, take the time to learn the app thoroughly. There are many features, and it’s essential to know how to use them all.

Another tip is to use the app to create a cut list. This will save you a lot of time and ensure that you have the right amount of wood for each piece.

Finally, be sure to use the 3D rendering feature to get a sense of what your design will look like in real life. This will help you make any necessary adjustments before you start building.

Examples of furniture design created using SketchList 3D

SketchList 3D  creates a wide range of furniture designs, from simple chairs to elaborate cabinets. One example of a design created using SketchList 3D is a modern coffee table. The designer was able to quickly create a 3D model of the table, make any necessary adjustments, and then use the cut list feature to generate a list of all the wood needed.

Another example is a custom-built bookshelf. The designer was able to input the exact measurements of each piece of wood and create a precise 3D model. This ensured that the bookshelf fit together perfectly when it was built.

Comparison of SketchList 3D with other furniture design programs

There are several other furniture design programs on the market, but SketchList 3D stands out for its ease of use and accuracy. Other programs can be complicated to learn and use, which can be frustrating for beginners. SketchList 3D, on the other hand, has a user-friendly interface that makes it easy to create designs quickly and accurately.

SketchList 3D also has a wide range of features that make it a versatile furniture design app for furniture design. Other programs may have similar features, but SketchList 3D’s user-friendly interface sets it apart.

How to get started with SketchList 3D

Getting started with SketchList 3D is easy. Simply download the app and start exploring the features. There are many tutorials available online that can help you learn how to use the app effectively.

It’s also a good idea to take the time to learn keyboard shortcuts. This will save you a lot of time when designing furniture, as you won’t have to keep switching between the mouse and keyboard.

SketchList 3D resources and tutorials

There are many resources and tutorials available online to help you learn how to use SketchList 3D effectively. The SketchList 3D website has a wide range of tutorials, as well as a user forum where you can ask questions and get help from other users.

There are also many YouTube tutorials available that can help you learn how to use SketchList 3D. These tutorials cover everything from the basics of the app to more advanced features.

Conclusion

SketchList 3D is a powerful furniture design app that has revolutionized the way I approach design. Its user-friendly interface, accurate measurements, and wide range of features make it the perfect tool for furniture designers. If you’re looking for a program for furniture design, I highly recommend SketchList 3D. With this app, you can streamline your workflow, save time, and create beautiful designs with ease.


To see more SketchList 3D click here.

To browse other ideas see these.

Categories
Basics and How to

Workbench ideas

Design a Functional Wood Workbench

Woodworking workbench with saw

Have you ever wanted to have a study place to work on all kinds of projects? A great addition to any home workshop, it provides a sturdy and reliable surface to work on. But how do you go about creating a durable and functional wood workbench?

Benefits

A workbench is a must-have for any serious DIY-er or woodworker. It provides a reliable and stable surface to work on, and it can even be customized to fit your needs. With it, you can work on projects such as woodworking, metalworking, electronics, and more.

It also helps to organize your workspace. It provides a designated area for all your tools and materials, making it easier to find what you need when you need it. This will save you time and effort in the long run, as you won’t have to search around for your tools or materials.

Finally, it helps to keep you safe. Working on a surface that’s too low or unstable can cause you to strain your back or even injure yourself. With a, you can work comfortably and safely on any project.

Different Types

When it comes to creating a workbench, there are several different types to choose from. Each type has its own advantages and disadvantages, so it’s important to choose the one that best suits your needs.

One of the most popular types of workbenches is the traditional wood workbench. This type of workbench is usually made from hardwood, such as birch or maple, and can be customized to fit your needs. They’re strong and durable, and can handle a lot of weight.

Another type of workbench is the metal workbench. These are usually made from steel and are great for heavy-duty projects. They’re also easy to clean, making them ideal for workshops with a lot of dust and debris.

Finally, there are also portables. These are great for those who need to move their workbench around frequently or who don’t have a lot of space. They’re usually lightweight and easy to store.

Maintaining a Workbench

Once you’ve built your unit, it’s important to take care of it so that it lasts for years to come. Here are some tips for maintaining your workbench:

  • Keep your workbench clean. Use a damp cloth to wipe down your workbench after every use to remove any dirt, dust, or debris.
  • Protect your workbench from the elements. If your workbench is exposed to sunlight or moisture, use a protective finish to keep it looking new.
  • Regularly inspect your workbench for damage. Check for any cracks, splinters, or loose screws and repair them as soon as possible.
  • Store your tools and materials in an organized manner. This will make it easier to find what you need and help prevent damage to your workbench.

Designing a Workbench to Fit Your Needs

You can start designing your workbench to fit your needs. Consider how much space you have available and what type of projects you plan to work on. This will help you determine the size and shape of your workbench.

You should also think about how you’ll be using it. If you plan to do a lot of woodworking, for example, you may want to include a vise or a router table. If you plan to do a lot of metalworking, you may want to include a grinder or a vice.

Finally, consider the features you want to include. Do you want drawers for storage? Shelves for tools? A pegboard for hanging tools? These are all great ways to customize your workbench and make it even more functional.

DIY Workbench Plans

If you’re looking for some DIY plans, there are plenty of free plans online. You can find plans for simple workbenches as well as more complex designs with drawers, shelves, and other features.  And of course with SketchList 3D you can design your own unique work platform.

Before you start building, make sure you have all the tools and materials you need. Read through the plans carefully so you know what you’re getting into before you start. And finally, don’t be afraid to ask for help if you need it.

Conclusion

Creating a durable and functional wood workbench is a great way to add a useful and stylish piece of furniture to your home. With the right tools and materials, and a bit of know-how, you can create a working place that fits your needs and looks great too. Just remember to take the time to design and build it properly, and you’ll have a reliable and sturdy workbench that will last for years to come.

So what are you waiting for? Gather your tools and materials, create your design, and get building!

Other samples look here.

Want a miter saw table?  See this.


Categories
Basics and How to Blog

Woodshop plans are necessary

 Woodshop Plans – Unlock the Potential for Amazing Woodworking Projects!


Woodshop plans help define the possibilities are endless when it comes to woodworking. From small projects like toy boxes to large pieces like armoires and dressers, woodworking can give you a sense of pride and accomplishment. However, many woodworkers struggle to get the results they want because they lack the necessary plans.  Woodworking plans are an important part of woodworking and can make all the difference in the success of your project.

What are woodworking plans?

Woodshop plans are detailed drawings and diagrams that provide an outline for making a project. These plans include measurements, cut lists, and instructions for assembling the pieces.

With the right plans, woodworkers can easily achieve their desired results. The plans provide a roadmap to success, allowing woodworkers to focus on the important aspects of the project without worrying about making mistakes.

Benefits of using woodshop plans

Woodshop plans provide a number of benefits to woodworkers. They help to save time and money by reducing the amount of trial and error that would otherwise be required to complete a project. Plans also provide a clear direction for the project, making it easier for woodworkers to stay on track and complete the project in a timely manner.

In addition to saving time and money, woodshop plans also help woodworkers to stay safe. The plans provide detailed instructions for the proper use of tools and safety precautions. This reduces the risk of injury and ensures that the project completessafely.

How to choose the right plan for your project

Choosing the right woodshop plan for your project is essential for ensuring its success. It’s important to consider the size and complexity of the project, as well as the materials and tools required. Beginners should focus on simple plans that do not require a lot of specialized tools or materials.

It’s also important to consider the skill level of the woodworker. If the woodworker is an experienced DIYer, more complex plans may be appropriate. However, if the woodworker is a beginner, it is best to start with simpler plans to avoid frustration.

Types of woodshop plans

There are a variety of woodshop plans available, each designed for a specific purpose. Furniture plans are the most common type of woodshop plan. These plans provide detailed instructions for creating furniture pieces, such as chairs, tables, and beds.

Other types of plans include cabinetry plans, toolbox plans, and outdoor plans. Cabinetry plans provide instructions for creating cabinets, while toolbox plans provide detailed instructions for creating toolboxes. Outdoor plans provide instructions for creating outdoor furniture, such as benches and swings.

Woodshop plan design

The design of a woodshop plan is an important factor in its success. Plans should include detailed diagrams and measurements that are easy to understand. The plans should also include clear instructions for assembling the pieces and using the tools correctly.

It’s also important to consider the aesthetic of the plan. Plans should fit the desired aesthetic of the project. For example, a plan for a rustic table should have a different design than a plan for a modern table.

Making the most of  plans

To get the most out of woodshop plans, it is important to understand the plans and follow the instructions carefully. Before beginning a project, it is important to read the plans carefully and make sure that all the materials and tools are on hand. It is also important to take the time to pre-cut the pieces and assemble them before beginning the actual project.

It is also important to take the time to understand the instructions and make sure that all the pieces are properly aligned. This helps avoid costly mistakes and ensure that the project is completed correctly.

Creating custom woodworking plans

If you are unable to find a plan that fits your needs, you can create your own custom woodshop plan or consider a woodworking planner software. Creating custom plans can be a time-consuming process, but it can be rewarding in the end.

To create a custom plan, start by sketching a rough outline of the project. Once you have a basic idea of what you want to create, you can begin to create a detailed plan. It’s important to include measurements as well as diagrams that show the construction and assembly of the pieces.

When creating a custom plan, it is important to keep the skill level of the woodworker in mind. If the woodworker is a beginner, it is best to keep the plan simple and easy to follow.

Finding and using free woodworking plans

There are a variety of free woodshop plans available online. These plans can be a great starting point for beginners or those on a budget. However, it is important to be cautious when using free plans. Many free plans are outdated or inaccurate, so it is important to double-check the measurements and instructions before beginning a project.

To find free plans, start by searching online. There are a number of websites that offer free plans, including DIY websites and woodworking forums. It is also possible to find free plans through social media websites, such as Pinterest and Instagram.

Conclusion

Woodshop plans are an essential part of woodworking and can make all the difference in the success of a project. From saving time and money to ensuring safety, woodshop plans provide numerous benefits to woodworkers. When choosing a plan, it is important to consider the size, complexity, and skill level of the project. For those who are unable to find the right plan, creating a custom plan or using a subscription service are viable options.

Check out other ideas for plans on this site.  Or go to see what Rockler offers.

By using woodshop plans or even a software design for woodworking, woodworkers can unlock the potential of their projects and create amazing woodworking projects. So, don’t hesitate to find the perfect plan for your next woodworking project. Good luck!