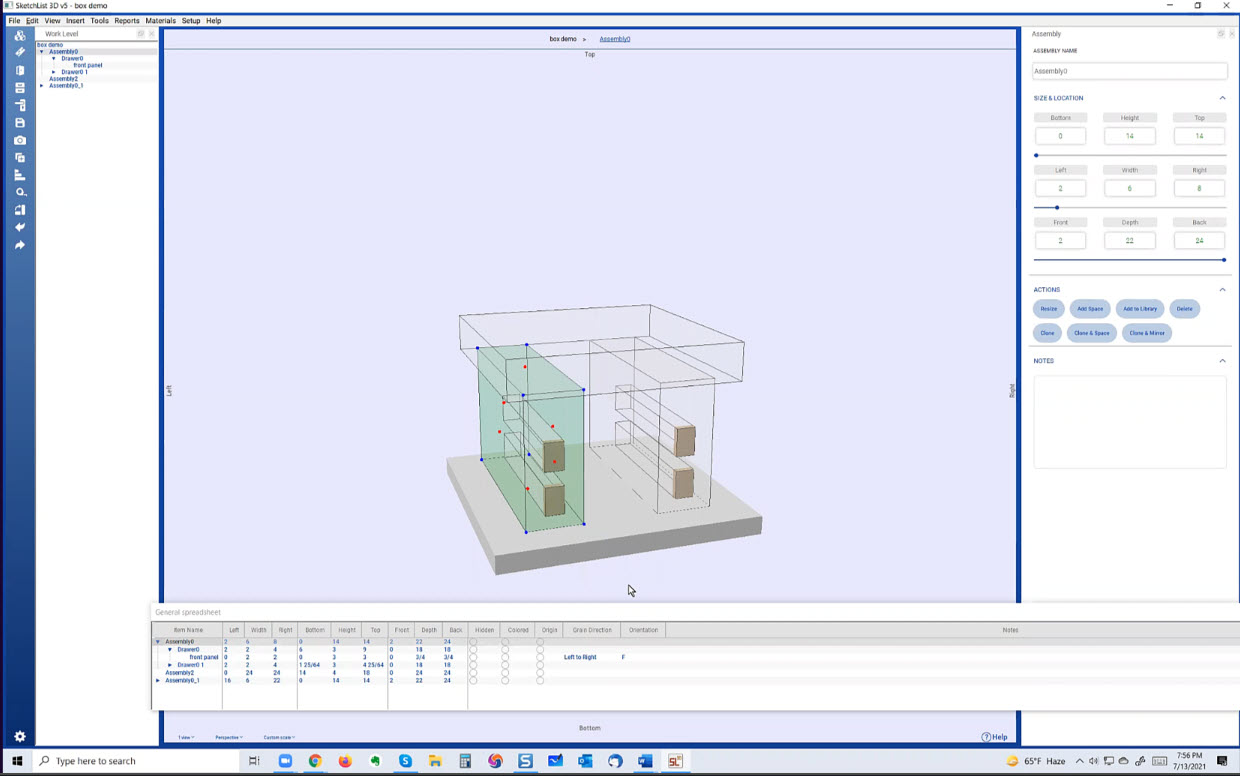
Woodwork design software learning in a group setting.
If you are a woodworker looking to improve your designs and still use pencil and paper to create them, you really want to begin using furniture design software for your designs. You will design better and do it more quickly. The ability to see your ideas in three dimensions will change your woodworking experience.
Sample screenshot
And of course, in order to use woodwork design software you need to learn to use it first. And that is not easy. I was in this position with my woodworking. But while I tried three software products [AutoCad, TurboCad, and SketchUp], I did not achieve any real success.
So I developed SketchList 3D furniture design software thirteen years ago. My concept was to make it possible for woodworkers, who are novice computer users, to create projects by creating, sizing, and positioning boards. Beyond that, furniture-making processes like joinery, shaping, and edging were all included as simple combinations of mouse clicks. Wait for it – one more – the shop drawings, cut lists, and sheet good layouts were automatically linked to the design.
That took some doing but worked out well.
The real challenge was to work with woodworkers to help them adapt the software to their designs.
While we work diligently to make the software easier to understand and use, and provide tons of documentation and videos, something was missing.
Our users called, texted, and emailed us with questions. Some paid for one on one training and consulting. And that was OK.
At the beginning of 2020, I started doing free weekly meetings with SketchList 3D users and people interested in learning about design software. So pretty much every week since, we have been meeting via Zoom to learn about SketchList 3D, review users’ designs, have people share ideas, tips, and advice.
I am thankful for the ability to do these meetings. Not only does it give me an excellent channel to user ideas and experiences, but through it, I saw the value of community and relationships with my users.
Earlier this week, we had a meeting that covered the basics of SketchList 3D woodwork design software interactively. Several people asked questions and made observations. It seems that everyone was pleased.
There is a YouTube video of the first section of the class. It covers using furniture design software for creating your project and structuring the various assemblies and subassemblies. The video runs for 16 minutes. Over the next week or so, I will post the other four sections.
The main concept in SketchList 3D cabinet design software is that you design with boards, organizing them into containers.
Containers can be the project that’s the high-level container, or assemblies within the container. Below the assembly level, you have doors or drawers, a door. and hardware.
Process
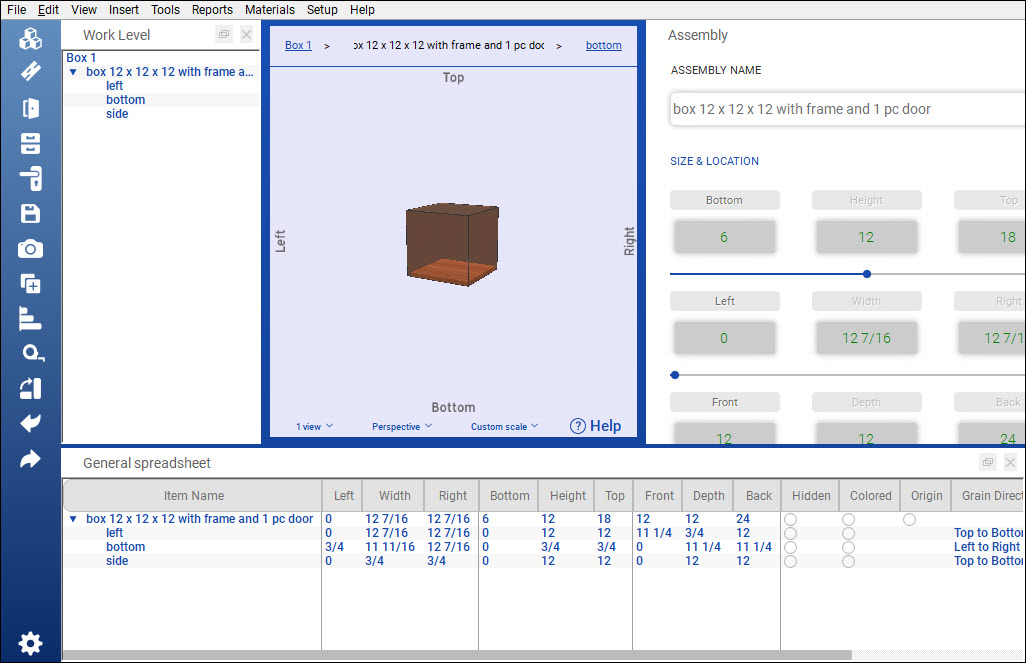
There are three steps in SketchList 3d, insert, size, and locate. The size is the width of the object from edge to edge. In this case, the distance between the left edge and the right edge is 12. The location is the distance between the left edge of the object and the left edge of its container.
In order to work in any container, you have to be at the proper level, I want to insert a board into this drawer. For example, I double-click that to get into the drawer level. And I’m all set.
Now I can insert a board. And the next step is that of sizing.
See the video.
There are three tools for sizing.
One is the red dots, I can right-click that changes size, like that.
The other tool for sizing is the form. So I could change the width from eight to six and click the button right and that becomes the new value.
Or I can do these on the spreadsheet. Say the height is four and click the top column heading and four inches we’re taking off the top of that board.
There are three tools for locating in SketchList 3D cabinet design software.
The first is the blue dot. I click the blue dot and hold down the shift key, I can drag this object anywhere. Although with the lack of control. I right-click that blue dot, I could set its value for the location exactly. And you’ll see that that’s where it’s located.
I can use the form for location. I wanted to move this six inches up from the bottom type and six. Click top. Put that all the way to the left type zero, click right, and same for the front back. The front is 12 back is located accordingly. There’s another if I go into the assembly level by double-clicking it.
The spreadsheet will also locate an object. When you enter the new value to the corner point and click the column header to change it.
The other way I can use the blue dots is to right-click the blue dots, copy their value. Right-click this blue dot paste its value and you’ll locate those two objects exactly together. Do that again. Copy and Paste. Now, these three containers all but together.
Boards used in cabinet design software.
Now we’ll consider what a board is in SketchList 3D. Insert a board into the assembly. A board can go into the assembly or a door or drawer. IA board can’t go directly into a project.
In the upper left-hand corner, I click the new board icon and give the board a name.
Pick the material. Then enter the width of the board and its height and its depth. The depth is the thickness, in this case, select the grain direction and click Add board. And that’s the board.
Now with these concepts and steps, you can virtually build almost anything in cabinet design software.
The woodworking design process used to be quite complicated. Even after hours of blood, sweat, and tears, it could still turn out to have been a waste of time and money. Nowadays, technology is making it easier and easier for people in the woodworking business to accomplish a lot more with a lot less effort. No woodworking business can afford to ignore software for woodworkers because it offers so many valuable benefits. Are you wondering how 3D woodworking design software can revolutionize the way your business operates?
Keep reading to learn about 5 benefits woodworking design brings to your business.
1. Woodworking Design Saves Time and Money
Without software, a woodworker resorts to old-fashioned paper and pencil to draw our plans. However, this method can easily lead to mistakes and a pile of crumpled papers in your wastebasket.
On the other hand, 3D woodworking software not only allows you to ditch the paper and pencil but it also gives you a huge range of other tools to use and other benefits.
For instance, as your digital plans are mapped out, they turn into realistic 3D models. This allows both you and your clients to get a clear idea of what the final product will look like without spending a dime on materials. In addition to saving you time and money, this has the added benefit of increasing customer satisfaction by a lot.
Another way you can save time and money, especially if you’re doing multiple projects that are similar, is by generating and reusing recurring design elements. That way, you can avoid planning out the same specifics over and over again. This allows you to simply focus on the differences between projects.
Best of all, unlike paper, our digital software is environmentally friendly.
2. Woodworking Design Reduces Waste
If things aren’t done exactly right the first time, a woodworking project can result in a lot of waste.
Everything is connected, which means that if your original plans aren’t correct, then you’ll end up buying the wrong amount of materials. Once you get the job into the shop, labor hours pile up. The longer you fail to realize that you’ve made a mistake, the more waste piles up. But with a effective woodworking design software, you can measure twice, or as many times as you want, and it’ll even optimize the materials you need so that your one cut is much more efficient. There are benefits you probably wouldn’t even have thought about.
However, with 3D woodworking software, you can ensure that your plans are correct from the get-go.
3. Woodworking Design Increases Sales
When you’re using a woodworking software to make sure your projects come out perfectly, you’re going to end up with a lot of happy customers.
Even among the internet age, word of mouth is still a powerful force. Happy customers will not only work with your business again but they’ll be recommending you to their friends, family, and colleagues.
If a first-time client is feeling a bit hesitant about working with you, when they see the 3D models that you generate with ease, they’ll know you mean business. All customers want to rest easy knowing that their project is in good hands. They’ll be able to do just that because 3D software proves your business is up to date in the 21st century. Another asset of woodworking software is that you can turn your 3D design into a photo-realistic rendering to show your customers exactly what the project will look like in context, putting you another head above the competition.
Additionally, sometimes a woodworking business needs to bid on a project. With 3D software, you can make accurate bids that won’t be too much or too little. This will allow you to nab more projects without losing out or disappointing customers with more fees.
4. Kitchen, Cabinet, and Furniture Design
Kitchens can be difficult to design because they need to look attractive, be highly functional, and take advantage of every inch of space that’s available.
However, with a 3D model, you can tinker and tailor with ease. After you’ve finished with the first mockup, your customers can have a much better idea of what it will look and feel like. If your customer wants something in the plan changed, you can do it with minimal effort. This is a huge benefit over pen and paper design because changing something on the design will readjust everything else accordingly. Find out more on the many benefits of a custom kitchen design software.
The same goes for cabinets which can be difficult to squeeze into certain spaces and plan out.
Aside from the kitchen, furniture, in general, is what truly makes a home or an office. Whether you want to design bunks beds, fireplace mantels, vanities, or something else, it all becomes much easier and simpler with a woodworking design program.
5. Easy to Learn Asset for Any Woodworker
What good is a design program if you can’t figure out how to use it? Luckily, there are programs out there that are designed with the user in mind, everything is made to benefit you.
When a piece of software is truly user-friendly, you don’t even have to read a manual to figure it out. In fact, you can simply play around with it and discover all the wonderful perks as you go along.
To help you further your progress companies offer tutorial videos that are quick and easy to watch. Individual training is always an option along with free online group training meetings. With these options, you don’t have to guess about how to do something or spend a lot of time trying to figure it out.
After you use woodworking software, you’ll never go back to pencil and paper again.
Ready to Have the Benefits Woodworking Design Can Bring to Your Business?
Now that you know all about 5 benefits woodworking design brings to your business, you can revolutionize the way you get things done. Grow your business. Increase sales. Improve profits.
SketchList 3D is the best software for your woodworking business. Even if you do woodworking as a hobby, our software can save you time, money, and more. That way, the software can pay for itself.
You can try our software for 14 days absolutely free and see for yourself how wonderful it is.
If you have questions about our high-quality products, feel free to contact us. We’re always happy to help you realize the benefits of woodworking design software.
Cabinet design software – mitered corners and contours
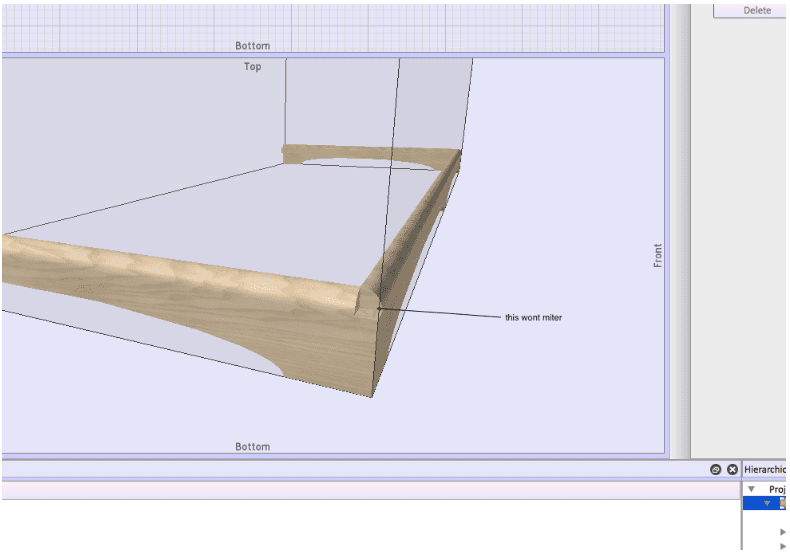
A user emailed me about a problem using our cabinet design software in his project. It’s a great example of clear communication – to the point with a screen shot to show the issue. I sent back a solution and will now make a video to discuss it.
Two boards meet in the corner and both boards have a rounded over contour on top and a miter on the ends. He ran into a limitation in SketchList 3D where cutting a hole can’t overlap other holes. This applies to joinery and contours as well.
You see the gap in the top of the corner. I ‘cut’ a corner piece with a round over contour going both ways and stuck it in the gap.
Watch the video. It contains some cool tips and tricks. Near the end of the videos I make good use of blue dots to connect things.
Thank you for your time. If you have any questions or comments level them below.
“Can’t seem to edit the joinery on the back of gables. Suggestions?”
This is a great user of our free kitchen design software. He communicated clearly. I asked him to export and send me the project which he did promptly. With it I was able to work with his ‘problem’ board and find the issue.
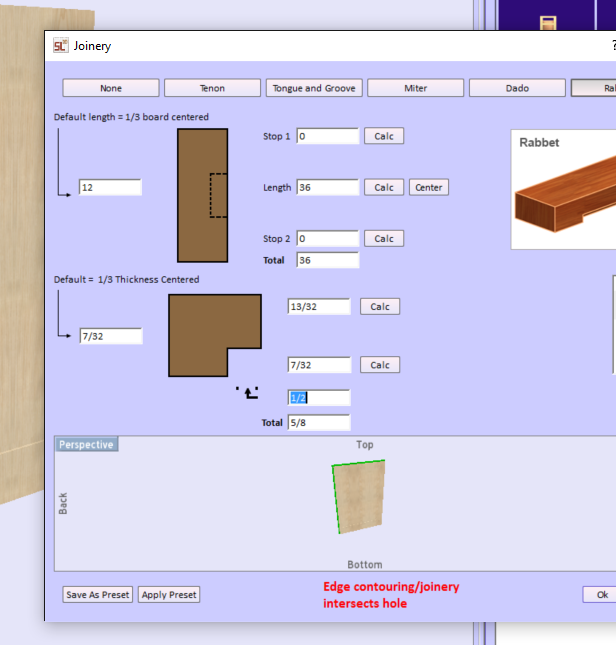
SketchList 3D sometimes has difficulty with overlapping holes. In this case the rabbet and the dado on the board surface were being set to overlap. Sometimes SketchList 3D predicts the problem and will not allow you to apply the rabbet, sometimes it issues a warning error.
The work around is to apply the rabbets to the edging before applying the dado. Then when you specify the dado length make sure it does not overlap the rabbet.
Here is the warning.
I clicked the Edit /Clone Holes button and right clicked the row for Hole1. Then I deleted it. At that point SketchList 3D would accept rabbets on both the back and top of the board.
I clicked the Dado button after selecting the surface of the board that would receive the dado.
With some distance between the rabbet and the dado SketchList 3D is able to cut both on this board.
The same process applies to shaping and contouring board edges. The rule is shape first and contour later. For example if you want to make a triangle shaped table top, select the board at board detail level [double click it]. Next select a surface and click Shape. Then delete one corner point to make the triangle. Exit the shape tool and select an edge. Click the contour button, select bull nose, and select the edges on which you want the contour. Go to assembly level and see your board.
Case Good Design – make sure to leave room on the front for frames and doors.
Next question from a user that might apply to more than this one person who was doing a case good design….
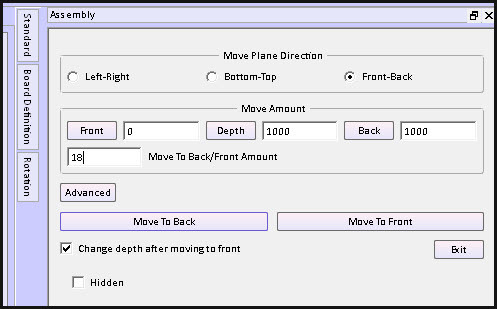
“If I want to add the doors at the end and forgot to leave front space for them I wasn’t able to move the whole assembly with exact 18 mm to the back to leave space for the doors without messing up the whole project – I had to start fresh again with the doors first.
I select assembly, input front 18, click on back for automatic calculation asks me for automatic resize and after it gives me error and dimensions come back to original. Moving with mouse is not exact and I get values with comas and is not that useful.”
I hate when I do this! And I still do – after nearly ten years. This very situation caused us to develop the batch move function. In Adrian’s case he needed to push everything in an assembly back by 18mm.
Normally this means every value of ‘front’ in you case design needs to change from 0 to 18 and MOST of the corresponding ‘back’ values changed to move the board backward. An exception happens when you need to shorten a board – like a side. Then the front goes from 0 to 18 and the ‘width’ changes.
A few other precautions.
The project depth must be large enough to hold the new size of the cabinet.
The assembly depth must be changed to fit the newly located and sized boards.
BUT WAIT. You are much better off using the Batch Move method.
Make the project depth big enough to hold the new depth of the assembly. If may already be big enough but be sure to check.
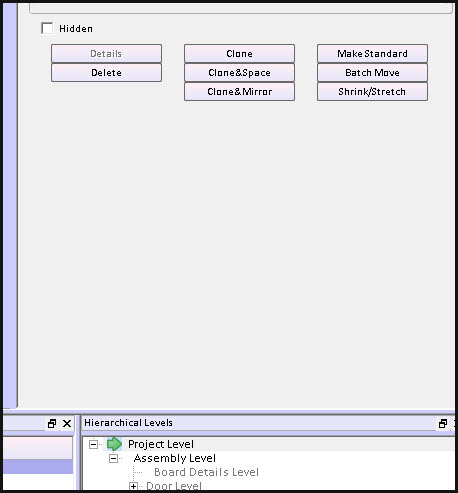
At project level – select the assembly you want to change and click the Batch Move button.