Project Setup Auto Add First Board
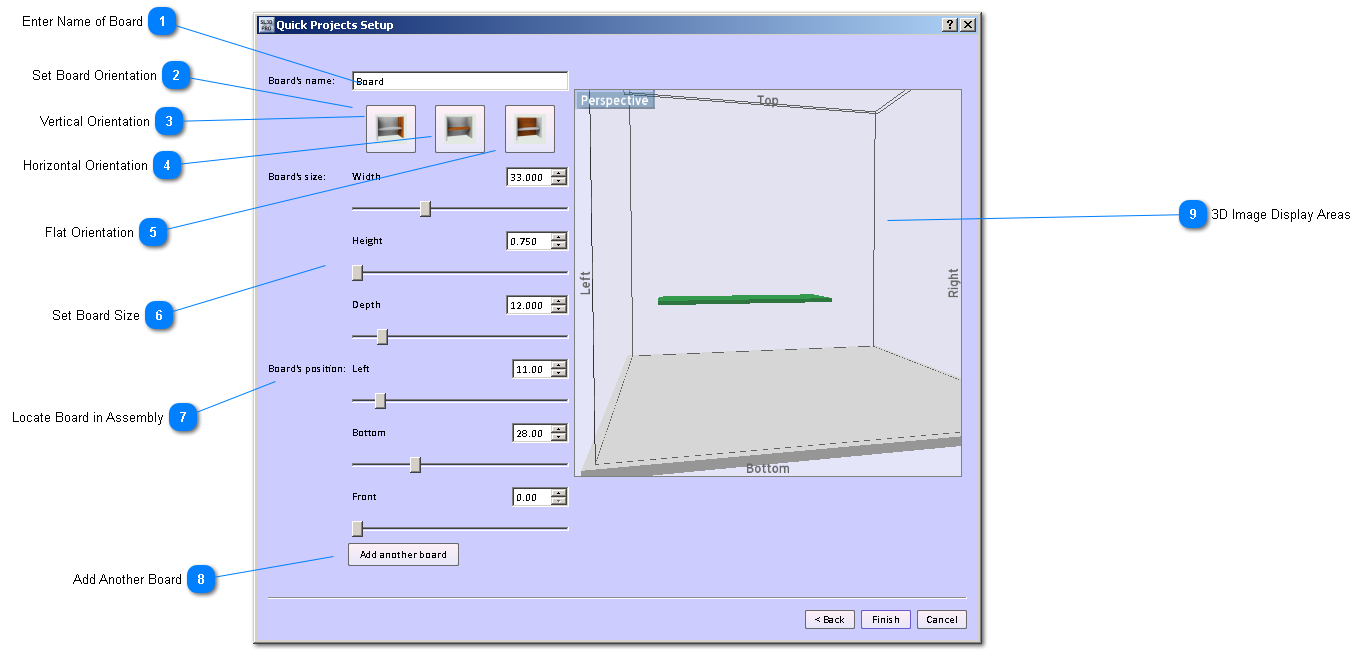
 Enter Name of Board
It is a very good idea to name boards are you create them. While easy to accept the SketchList 3D generated default names, they provide no information about the type or function of a board. The name Side support left is much more helpful than Board132.
Also think about the structure of the board names. For parts reports that you generate, you may choose to sort by part name. All boards named beginning with the word Shelf for example will be grouped together. So Shelf Top and Shelf Bottom are better names than top shelf or bottom shelf because the sort will place the first two names together.
|
|
 Set Board Orientation
Board orientation answers the question "What does it look like from the front view?" SketchList 3D uses orientation to manage boards, place them onto materials in the proper manner, and to distinguish edges from surfaces.
|
|
 Vertical Orientation
 is used for boards like a side, or a support, or a divider. It's surfaces are facing right and left.
|
|
 Horizontal Orientation
 is used for boards like a shelf, top, or bottom. It's surfaces are facing top and bottom.
|
|
 Flat Orientation
 is used for boards like a skirt, a rail or stile, or the back of a cabinet. It's surfaces are facing front to back.
|
|
 Set Board Size
The are three elements of a board's size: width (from side to side), depth (from front to back) and height (from top to bottom). For more of an explanation CLICK HERE.
The values of width, heights, or depth are increased or decreased in three ways.
-
Slide the slider to the right to increase and to the left to decrease the value.
-
Click the up and down arrows to the right of the value to increase (up arrow) or decrease (down arrow) the value.
-
Type the value directly into the text box.
|
|
 Locate Board in Assembly
The are three elements of a board's location within the assembly using that board's distance from the :
Left (from side to side),
Bottom (from bottom to top)
and Front (from front to back). For more of an explanation CLICK HERE.
The values of width, heights, or depth are increased or decreased in three ways.
-
Slide the slider to the right to increase and to the left to decrease the value.
-
Click the up and down arrows to the right of the value to increase (up arrow) or decrease (down arrow) the value.
-
Type the value directly into the text box.
|
|
 Add Another Board
This adds an additional board to the assembly.
|
|
 3D Image Display Areas
This image area shows the assembly and the boards in it. You can use your computer mouse / cursor to spin the assembly in 3D and the mouse track wheel or ball to increase or decrease the size of the image. You can focus on specific areas of the image by holding down the control key and moving the mouse /cursor while holding down the left mouse button.
|
|


