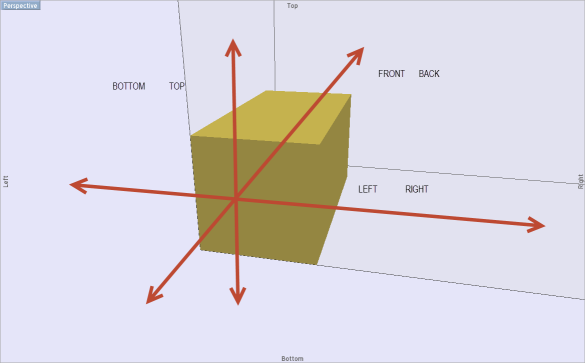
You may have learned at some point that every object has 6 degrees of freedom in 3D space.
This basically means that that object can be moved in three dimensional space in six directions along three axis.
-
(1) Front and (2) back
-
(3) Right and (4) left
-
(5) and (6) Top bottom
Course any combination of moving things from front to back, left right and top to bottom can locate those things and space.
To move an object to the right, you can
-
Increase the left value and change the right value automatically.
-
Increase the right value and change the left value automatically.
-
Hold the left value, increase the width, and change the right value automatically.
The same applies to up and down and front to back.
SketchList 3D takes this one step beyond.
If you think about it – for example a board – the right left values also tell you the width of that board.
If the left value of the board is zero (meaning that that board is flush with the left edge of its assembly) and the right edge of that board is 48 (meaning that right edge of the board is 48 inches from the left edge of the assembly ) then we know that board is 48 inches wide.
To manipulate boards in SketchList 3D -- from left to right - you can change the values of left, width, or right and have SketchList 3D calculate the changes in the other values.
For example with the board above left equals zero, width equals 48, right equals 48. In SketchList 3D it's very easy to change the value of the width from 48 to say 36. Entering in 36 for width you have a choice. You can click on the button labeled left and sketch list will do the following calculation.
Right minus width equals left. So 48-36 equals the new left value of 12.
You might enter 36 for the new value of the board width and choose to click the right button. Then the calculation is this.
Left + width = right. So 0+36 equals the new right value of 36.
After a while this thinking becomes second nature.


